Fireworks Photography tips and examples

Here are some basic starting points

If you have any questions, stop by the store, email or call. We’re here to help. Please let us know if you get some great shots we’d love to see!
Please feel free to leave your comments and suggestions. Have a great 4th of July Holiday weekend from all of us at BCC.

Find a fireworks display on NJ.com’s July 4th events page

Tripod
Electronic release (available for most cameras at BCC)
Manually set your camera ISO to 100 (You do not want Auto ISO)
Lens Choice – Wide Angle Zoom to frame what you’d like to capture
Auto White Balance or Daylight
Set your lens to manual focus then focus to infinity (take a test image and make sure things are sharp)
Set your camera to Manual exposure – Try 5 seconds at f/ 16
Carefully release the shutter if not using a release to capture from one to several bursts
Evaluate your exposure – Shorter exposures (or smaller aperatures ) will darken the image and capture shorter trails, Longer exposures (or larger aperatures ) will lighten the image and capture longer trails.
Evaluate sharpness by zooming in on your image – adjust as needed

If you are using a point a shoot, check your camera’s manual for fireworks mode.

Improving Fireworks photos
Shoot with a tripod – it will give a more natural cascade of light
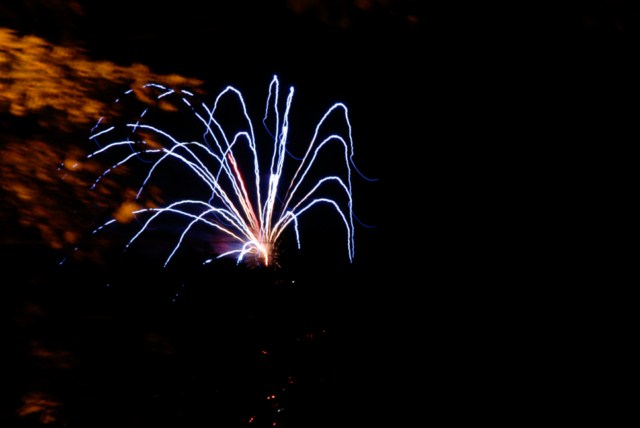
Why use a tripod?

Handheld image above shows motion from camera shake  in the burst of light.

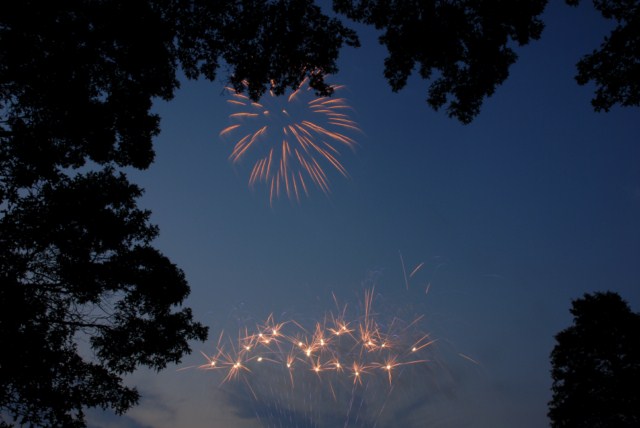
The image below is steadied by a tripod, 5 seconds, f16 at 100 ISO


Other Techniques
Set your camera to B and lock open your shutter – keep the lens covered with a dark hat and remove the hat to capture a burst then recover and repeat to capture several bursts. Just be carefull not to bump your camera.
You can even zoom the lens during exposure for some interesting effects

Experiment and best of all have fun

Gallery images below shot mainly at 5 seconds, f16 at 100 ISO

Don’t be a hard drive crash test dummy


Our customer’s hard drive crashed. It stored nearly 10 digital years worth of her family images: births, family vacations, birthdays, parties, graduations, and other events. Our customer’s digital images had not been printed out (unlike analog photos) – they had been shared on the computer and occasionally uploaded to a digital frame or to an online photo site. Her backup consisted of an external hard drive (also damaged) and an incomplete collection of floppy disks, CDs and DVDs, plus about 1% of their images saved at an online photo site.

This was just too close for comfort, since my own personal backup situation was similar. During the past 15 years I’ve relied on a hodge podge of backup methods: floppy disks, tape drives, CDs, DVDs, online photo services and other online backup solutions.

I set out to find a reliable, affordable online backup solution for my data. Online photo websites that are free often have fine print in the user agreement that allows website to reduce the resolution of stored images if you don’t make a certain number of paid prints, etc. Although it is extremely easy to upload hundreds of images to these websites, if you ever want your images back you must download them one by one which becomes an impossible task if you have thousands of images, as many of us do. (The BCC digital lab was recently hired for $125 an hour by a customer who lost several hundred images, to download images individually from his online printing website – not an inexpensive proposition).

AT LAST: A SMART, AFFORDABLE SOLUTION

After spending some time researching I chose Mozy.com online backup. I signed up for a yearly account. Just moments after installing the Mozy applet, data started backing up over my cable connection at about 10 gigabytes a day. Well, it’s finally complete – for the first time ever I have a complete off-site backup of all my images . . . nearly 50,000, genealogy files, and documents taking up just over 500 Gb (that’s more than half a terabyte, 500,000 megabytes, or the equivalent of about 800 CDs).

Mozy.com is a fully encrypted online backup service that costs around $55 a year. Less if you get a 2-year membership paid up front. Once signed up you have unlimited storage for the flat annual fee. With Mozy you can back up one computer and any drives that are connected to your computer. Many other online backup solutions will only backup drives inside your computer, not external drives. Once installed the process is very automatic. If you power down or reboot your computer, the backup resumes automatically. Backups over broadband upload 5-10 gigabytes per day. Easy configuration options even allow the backup to proceed only when the computer is idle. My computer is relatively new so I left it set for maximum backup speed for the entire time. Mozy will also automatically add and delete as you move files into or out of your watched folders you designate.

At last, I have my images protected.

Also just added to Mozy 2.0 is the ability to create a local backup to an external drive which gives you the best backup a scenario – a local and remote copy!

To learn more or sign up for your own Mozy account, just click on the Mozy logo below.

Olympus in Mexico – Impressive results from the Olympus E-PL1

Here are some great shots taken with the Olympus E-PL1 by our friend Peter Ewen from his recent trip to Mexico. We thought the pictures really showcased the ability of this micro 4/3 camera from Olympus. Small, compact and full of features it’s a great camera to travel with. Feel free to leave a comment for Peter if you’d like. BTW, Peter’s day job is Director,  Product Marketing, DSLR for Olympus. Bergen County Camera has a full line of Olympus 4/3 cameras, lenses and accessories.

Photoshop CS5 – Looks like an awesome upgrade!

After watching the CS5 anouncement on Monday I have to say that I was quite impressed with what they’ve included in this update. In the past 10 years, more than one update to Photoshop initially left us wondering what’s this update all about and why did I just spend another $159! Every time after a month or two of using the new tools I’ve wound up impressed and was once again a strong supporter of Photoshop. CS5 looks amazing right out of the gate and that’s before I have even had a chance to use the program.  Abby from Bergen County Camera recently visited Photoshop World in Orlando and was among many industry experts and beta testers of Photoshop CS5 who as a group were impressed with CS5. (Abby’s Photoshop World Post)

Adobe Photoshop CS5 box image

Here’s a few things that I think will make this a super upgrade out of the box. These features are really a jump from CS4 and in the words of Adobe – “Eye bleeding cool”

  • Smart radius for edge detection when making a selection
  • Content aware fill – Remove a horse or any object from an image and CS will intuitively rebuild the background from available image information! Wow!
  • When using any kind of a stroke – CS5 will let you vary the width at any point you choose.
  • CS Review – a new add on feature that lets you share your work for comments online with other CS5 users
  • New improved natural and realistic painting tools
  • All new 64-bit Raw processing engine
  • All new merge to HDR Pro – with subtle controls to choose parts of the image and make adjustments within this powerful automatic workflow. You will even be able to automatically fix ghosting as in the case of trees in a breeze moving between your HGR shots. You will also be able to use these new HDR tools on a single image as well.
  • New improved sharpen and de-mosaic filters
  • Better noise reduction – remove luminance noise and add film like grain and more
  • Automation of Lens correction based on file EXIF information. For example you could fix all chromatic abberation with your lens at f2.8 and have every image automatically adjusted on import. The same would be true for vignetting or any other lens correction option in the program. For rare lenses not in the original release, Adobe will rely on online reporting and will post EXIF corrections for these lenses as well.

Photshop CS5 looks amazing and everyone at BCC is looking forward to its mid May arrival. We will stock upgrade versions for both PC and MAC (newer Intel based MAC’s only) If you have any questions or comments email or comment here – Thanks!


Lunar Photography – getting the correct exposure

Man in the Moon
"Man in the Moon" taken during a partial lunar eclipse

Next Full Moon – March 29, 2010 

I recently had a customer ask me the best way to photograph the moon. It seems that they never could see any detail in the moon (overexposed) and the overall image was dark.  First, the moon is much brighter and takes up a small portion of the image – the camera meter gets fooled since it sees all the darkness and sets an exposure that washes out the moon. Second the variation between light and dark values is beyond what your camera is capable of capturing in a single shot. We’ll talk about a fix to this problem later on . . . a little trick that involves using an imaging program like Photoshop Elements.   

To capture the full “Man in the Moon” effect is easy to do by setting your camera manually to expose for the moon.  We set the camera manually because your camera’s metering system usually gets fooled.   Setting your camera manually eliminates this exposure error – the moon is always lit with the same intensity with the exception of solar eclipses.  

For the complete “Man in the Moon” look, we suggest the following exposure – ISO 100 -1/125th second @ f/11When the moon is not full it is also very easy to get your exposure. Since a half moon is half as bright you just need to open your lens up by one more stop which lets twice a much light in – ISO 100 – 1/125th second @f/8. Using the same convention a 1/4 moon would require 4x as much light as the full moon or 2 stops more light and a setting of  1/125th second @ f/5.6. A tripod is always a great option for the sharpest shots especially when using a telephoto lens.   

Black Cat Exposure Guide
A Black Cat exposure guide (pictured above) is a great tool that lists manual exposure settings for more than 100 scenes. Just choose your scene – line up the scene code to your ISO and just set your camera to one of the displayed f-stop and shutter speed combinations. The Black Cat Exposure Guide is a must for anyone into time exposure and existing light photography. We stock the Black Cat Exposure Guide in Westwood & Englewood.  

Getting both the moon and your scence exposed correctly in the same image is easily accomplished by compositing a properly exposed image of the moon with a properly exposed night scene in a program like Photoshop Elements. 

Questions – Stop by, email or give us a call.  Comments? Let us know if you liked this post. What other things you would like tutorials about?

Leica M9 firmware updated to v1.116

We’ve received several phone calls starting today about Leica’s new firmware for the M9. Although this was a rumor earlier today, it is now confirmed as I just received the official announcement from Leica. The M9 firmware version 1.116 is now available for download for registered owners of the M9.

Leica M9 v1.116 firmware download    Full Firmware installation instructions

Leica M9 Downloads Index with full info about the camera, detailed instructions and available downloads. Please give us a call if you have any questions.

This firmware updates the following as taken from the Leica announcement:

The improvements in the Firmware Version 1.116 are:

Camera Performance:

  • Faster zooming into the last picture taken.
  • Speed of SD-card formatting enhanced.
  • Image quality of “thumbnail” pictures improved.
  • SD- Card compatibility improved*
  • correction at ISO 2500, interpolated for intermediate ISO steps.
  • New ISO setting-related vignetting correction: strongest correction at ISO 160, and lowest
  • Magenta colour shift correction for the following wide angle lenses improved: M 18mm/f3.8 ASPH (11649), M 21mm/f2.8 ASPH (11135), M 24mm/f3.8 ASPH (11648), M 28mm/f2 ASPH (11604), M 28mm/f2.8 ASPH (11606)

Bug fixes:

  • Transfer of large data amounts to a Mac in USB-Mass storage mode.
    Sensor cleaning mode with battery capacity <50%.
    Function “Deleting all images” while zoomed picture is shown on screen.
    Function “Deleting all images” from a SD card with non-M9 pictures on it.
    Interrupting a long exposure by switching off the camera.
    Zooming into pictures with “Vintage B+W” setting.
    Max aperture value” in EXIF data corrected for the following lenses: M 35mm/f1.4 (11869, 11870, 11860), M 50mm/f0.95 ASPH. (11602), M 50mm/f1.2 (11820), M 135mm/f3.4 APO (11889), M 135mm/f4 (11851, 11861)
    Wording issues in English, Japanese and traditional Chinese menus
    Various other minor bug fixes.
     

How to Get White Snow – Winter Shooting Tips

White snow with camera at plus 1

Why is my snow grey

Predominantly white scenes ( think Snow, white sand beaches, clouds )will be moved toward grey so we must over expose from .5 – 1.5 stops to get true white by using the +/-.
Predominantly black scenes ( think black cars, black buildings, black sand beaches )will be moved toward grey so we must under expose .5 – 1.5 stops to get true black by using the +/-.
 A future tutorial will explain how to get perfect exposures using a grey card.

Using histograms to further understand

For those familiar with histograms we can further look into diagnosing our exposure. The histograms are shown below with both our camera exposure and with exposure compensation set on + 1.0. Histograms are available in almost any digital camera including point and shoots and most imaging programs like Photoshop Elements.

A histogram is just a map of the tonal values in our image from black (left most point) to white (right most point) with the height representing how much of the image is at a particular level of brightness. Your histogram will look the same in camera and when you open that image up in your imaging program.


^Black                   Middle^Grey                        White^

Grey snow historgram - normal exposure

In the grey snow example above our histogram has a good deal of room before the white point on the right so the image represented by this histogram is a shade of grey not white. By overexposing one stop ( +/- +1.0) the camera automatically adjusts and allows 1 extra stop or twice the amount of light. As you can see from the histogram below we still have a small amount of room before the white point (this room indicates we have not blown out our highlights. If this histogram started all the way to the right and did not build to a peak, this would indicate over exposure and blown out highlights. The fix would be to reduce the exposure compensation from +1.0 to +0.7 and check again. The peak will move to the left each time you reduce your exposure. More on histograms in an upcoming tutorial.

White snow when overexposed histogram

Please let us know what you think of this tutorial and let us know what else is causing a challenge in your photography.


Canon Basic Class: Essential Functions of your EOS Camera

February 17, 2010 7:00pm-10:00pm – Tickets – $25

This event will take place at the Park Ridge Marriott, 300 Brae Blvd., Park Ridge (map and directions) Tickets are availabe from Bergen County Camera in Westwood or Englewood or by calling 201-664-4113. Tickets will not be available at the door.

This will be the third time we’ve hosted a Canon basic class at the Park Ridge Marriott. This class is always highly rated, and is a great way to learn more about your Canon EOS Digital SLR. Everyone who attends will receive a 100 page Canon basic guidebook to follow along with during class and to review afterwards.

Canon Digital Learning Center Class

Here’s the course description from Canon:
Enter the world of the digital SLR and learn about your camera, and how to make great pictures with it. We’ll take you out of “automatic”, but we won’t overload you with too much detail.  You’ll see many examples of great photography, and learn techniques to use exposure, composition, flash, and a variety of lenses to get the same types of results. Our Basic Discovery Day class is a three-hour investment in your EOS digital SLR that will pay dividends over and over as you grow with your camera system.

During this course you will:

  • Become familiar with the operation and features of your EOS camera, and discover how and when to control them for dramatic results
  • Learn to expand your creative options, using different camera features and photographic techniques to evolve your pictures from snapshots to photographs
  • See actual examples of how Canon lenses and Speedlite flashes can be used to add impact to your pictures

Eager to learn more about your EOS Digital SLR before attending an EOS Discovery Day? Just stopy by Bergen County Camera or give us a call 201-664-4113 (Westwood) or 201-871-4113 (Englewood)

Learn More – Backing up your valuable images to CD media

Historical Posting – Originally published in 2008 – Since this is an archived story – products mentioned may not be available or even made any more – Let us know if you have any questions. Backup is essential to keeping your images safe.

An updated post on our blog is here

Backing up your digital images is relatively inexpensive these days with the advent of high quality archival DVD’s and inexpensive DVD recorders often called burners. Even if your computer or laptop does not have a built in burner, there are many low cost external models that work with your computers USB ports. USB 2.0 devices are much faster than USB 1.0 devices – just make sure your computer supports the faster USB 2.0 standard before making your purchase.

Once you have your burner, you need to purchase a quality archival DVD media to make your backups on. The key word here is archival as many DVD’s are available for purchase with many levels of quality. Archival DVD’s are made to save files, and are of higher quality. Even though a DVD may say archival, you should make new backups of a DVD every five years to stay on the safe side.

In addition to DVD’s is the growing popularity of internet and cloud-based backup solutions. Comapnies such as Mozy let you back up your important data to the internet. Mozy saves your data locally to your own computer and to the internet. No matter what happens, your data will always be secure and safe from physical damage with Mozy.

Check out Mozy here

Media Buying Suggestions

Backup your data only with DVD-r not re-writable DVD-rw

When writing your disk – Close the session and prevent
additional writes. This protects data from erasure.

Do not use the maximum write speed for your DVD burner
A burn speed of 4x on quality media should last many years in dark storage.

Bergen County Camera sells quality archival DVD’s for all your photo backup needs.

Suggestions for keeping your data safe

Always hold the DVD up to the light before burning to check for any pinholes or other obvious damage to the media.

Even an archival DVD is only one good scratch away from becoming a coaster. For this reason I suggest making two copies of important once in a lifetime images.

If possible keep your backups in a location separate from your computer. Some of our pro’s go so far as to keep a second copy in a safe deposit box. If you are using a home fire safe be sure they are “fire rated” for DVD media not just paper documents.

Save your files in a common file format. Once saved you need to keep alert to changes in formats and computer technology. The day you hear talk about discontinuing DVD drives is the day you should start migrating your backups to a new platform. Just think how hard it would be to find a 5 1/2″ floppy disk today!

To be safe, plan on recopying your DVD backup every 5 years or so. Store your disks in the dark or at the very least out of direct light.