Fall Foliage: Tips and State Foliage Websites

Foliage Photography: Tips for Great Pictures

Foliage Maps:

The Foliage Network Maps – website with frequent updates and color maps of the northeastern United States.

Filters

A polarizing filter is really the only “must have” filter to bring along for great digital fall foliage pictures. A polarizer creates dramatic fall foliage pictures by darkening the sky, increasing contrast and deepening colors and removing the sheen from the leaves. Most other filter effects such as enhancing reds and oranges, sepia and graduated effects can be easily created in Photoshop. Your standard protective UV filter should be removed before putting your polarizer on – never stack filters. Also, don’t forget to remove your polarizer when you move back inside, as it reduces light by one to two f-stops. Shop Polarizers in our online store.


Click to see image with and without a polarizer.

A second type of filter is an enhancing filter which does just what the name implies – enhances. This filter is especially effective with the bright primary colors of autumn (reds, oranges and browns). A third filter is a Color / Neutral Graduated filter which utilizes a color (or gray) that gradually diminishes from dark to light across the filter. These filters are often used to deepen the sky or to balance the exposure between foreground and background, which helps you keep the sky blue rather than washed out.

Tips

  • Nothing takes away from foliage more than a bright white overcast sky. In these situations, try to reduce the amount of sky in your images or use a Neutral Graduated filter.
  • Dramatic storm clouds of autumn thunderstorms interspersed with blue sky make a stunning backdrop for the brilliant colors of fall, especially when the vivid colors are brought out with a polarizer filter.
  • Use a tripod for the sharpest possible image. This will allow an ISO of 100 or 200. Remember to use a remote release or self timer to prevent motion when pressing the shutter.
  • Colors are warmer and can be more dramatic closer to sunrise and sunset. The hour before and after sunrise and sunset are considered by many to be the “magic hours” where you get an amazing quality of light.
  • Experiment, take lots of pictures and above all have fun!
  • Since you are shooting more with your digital camera, be sure to edit out some images before showing off your work to family and friends
Once you’ve assembled your camera and a few filters, all you’ll need is foliage at the peak of color. We’ve assembled a list of state hotlines below to help schedule your trip. Need some ideas for places to shoot, be sure to visit Bergen County Camera’s Where to Take Great Pictures page. Have some suggestions of your own? Please send us an email or comment on this post.

Fall foliage Websites and Hotlines

The Foliage Network – website with frequent updates and color maps of the northeastern United States.

State by State foliage websites – click on your state of interest below.

New Jersey 
mid to late October 
Connecticut
 Late September - mid October 
Maine 
Early September - mid October
Massachusetts
October 
New Hampshire 
Late September - mid October
New York
Late September - late October
Pennsylvania 
Early October
Vermont 
Early September - Late October
Virginia 
September - Late November
Delaware 
Late October
Maryland 
Late September - Late October
Rhode Island 
Late September - mid October 

Remember to visit Bergen County Camera for filters, tripods, lenses, cameras and prints.

Fall Foliage: Tips and State Foliage Websites

Foliage Photography:
Tips for great pictures

Foliage Maps:

–>> The Foliage Network Maps – website with frequent updates and color maps of the northeastern United States.

Filters

A polarizing filter is really the only “must have” filter to bring along for great digital fall foliage pictures. A polarizer creates dramatic fall foliage pictures by darkening the sky, increasing contrast and deepening colors and removing the sheen from the leaves. Most other filter effects such as enhancing reds and oranges, sepia and graduated effects can be easily created in Photoshop. Your standard protective UV filter should be removed before putting your polarizer on – never stack filters. Also, don’t forget to remove your polarizer when you move back inside, as it reduces light by one to two f-stops. Shop Polarizers in our online store.


Click to see image with and without a polarizer.

A second type of filter is an enhancing filter which does just what the name implies – enhances. This filter is especially effective with the bright primary colors of autumn (reds, oranges and browns). A third filter is a Color / Neutral Graduated filter which utilizes a color (or gray) that gradually diminishes from dark to light across the filter. These filters are often used to deepen the sky or to balance the exposure between foreground and background, which helps you keep the sky blue rather than washed out.

Tips

  • Nothing takes away from foliage more than a bright white overcast sky. In these situations, try to reduce the amount of sky in your images or use a Neutral Graduated filter.
  • Dramatic storm clouds of autumn thunderstorms interspersed with blue sky make a stunning backdrop for the brilliant colors of fall, especially when the vivid colors are brought out with a polarizer filter.
  • Use a tripod for the sharpest possible image. This will allow an ISO of 100 or 200. Remember to use a remote release or self timer to prevent motion when pressing the shutter.
  • Colors are warmer and can be more dramatic closer to sunrise and sunset. The hour before and after sunrise and sunset are considered by many to be the “magic hours” where you get an amazing quality of light.
  • Experiment, take lots of pictures and above all have fun!
  • Since you are shooting more with your digital camera, be sure to edit out some images before showing off your work to family and friends
Once you’ve assembled your camera and a few filters, all you’ll need is foliage at the peak of color. We’ve assembled a list of state hotlines below to help schedule your trip. Need some ideas for places to shoot, be sure to visit Bergen County Camera’s Where to take great Pictures page. Have some suggestions of your own? Please send us an email or comment on this post.

Fall foliage websites and hotlines

The Foliage Network – website with frequent updates and color maps of the northeastern United States.

State by State foliage websites – click on your state of interest below.

New Jersey 
mid to late October 
Connecticut
 Late September - mid October 
Maine 
Early September - mid October
Massachusetts
October 
New Hampshire 
Late September - mid October
New York
Late September - late October
Pennsylvania 
Early October
Vermont 
Early September - Late October
Virginia 
September - Late November
Delaware 
Late October
Maryland 
Late September - Late October
Rhode Island 
Late September - mid October 

Remember to visit Bergen County Camera for filters, tripods, lenses, cameras and prints.

Free Saturday Focus Sessions February – March

Focus sessions are Free and take place in our store from 9:30 am – 10:15 am. Focus Sessions are mini classes and discussions and classes about photography. All sessions will allow for questions and answers. Please bring your camera and any images along that you have questions about. Please share your thoughts for future focus sessions in the comment box below. No RSVP – Free for everyone – Please bring a friend!

focusbanner1Hit the “Like Button” to let your friends know. Have suggestions for future focus sessions? Feel free to leave a comment.


Here’s our upcoming Focus Sessions:


February 20 – f2.8 vs f5.6 – Learning to control focus and gaining higher shutter speeds

February 27 – Print formats, from square to panoramic – how to showcase your images

March 5 – Parade Photos + Billy on bagpipes

March 12 – Photo Exchange – Trade your photos – Bring one take One – 8×10 only

March 19 – Food Photography

March 26 – Easter Flowers / Easter Egg Hunt for the Grown-Ups (discounts a freebies hidden around the store) Limit 1 egg per customer

These are free events – bring a friend along if you’d like. Share with your friends on Facebook – Click the Like button below. Hope you can join us!

"fo</p

Free Saturday Focus Sessions for January

Focus sessions are free and take place in our store from 9:30 am – 10:15 am. All sessions will allow for questions and answers. Please bring your camera and any images along that you have questions about. Feel free to use the comment option to make suggestions for future focus sessions.

focusbanner1Hit the “Like Button” to let your friends know. Have suggestions for future focus sessions? Feel free to leave a comment.


Here’s our upcoming Focus Sessions:


January 2 – Shooting Geometric Patterns

January 9 – Using your flash (better)

January 16 – What is this button on my camera and why and when to use it

January 23 – f2.8 vs f5.6

January 30 – Shooting Basketball

These are free events – bring a friend along if you’d like. Share with your friends on Facebook – Click the Like button below. Hope you can join us!

"fo</p

A Collection of Holiday Photo Tips

Rockefeller Center Tree with point and shoot digital
Rock Center Tree – Gerri Facchine

Winter Photography – Free Focus Session in Westwood December 29 at 9:30 am. Focus Sessions take place almost every Saturday at 9:30 am at our Westwood location and are open to everyone – bring a friend! Our Englewood location hosts a Q&A every Saturday at 10:30 just bring your photography or imaging based question.

Below is a collection of blog posts related to the holidays and winter picture taking to hopefully inspire and provide some helpful tips. Please email, call or stop in if you have any questions about photography we’re here to help. In addition to a weekly Free Focus Sessions, we offer a range of photography and imaging classes on a variety of topics.

Holiday Picture Taking Challengers

Winter Digital Camera Tips

Holiday Lights

Holiday Stuffing – Steady Shots

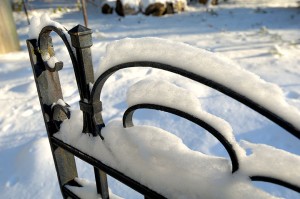
Snow – Photographing Winters Majesty

Winter Shooting Tips – How to get White Snow

Holiday Lights - Christmas Boat Parade
Photo – BCC Guest Blogger Franklin Viola


Outdoor Lighting Tip Videos

In this three part series, Bergen County Camera’s Paul Carretta talks about using reflectors and diffusers to enhance the lighting in outdoor situations.

In the first video, Paul discusses how to add extra natural light in an outdoor setting using a 41″ Promaster reflector.

Next, Paul shows us how to use a diffuser to reduce the amount of harsh shadows on a subject.

Lastly, Paul demonstrates how one can use a silver reflector to amplify sunlight.

Fireworks Photography Tips – July 2012

Where to photograph fireworks
North Jersey’s parade, firework and celebration map

Here are some basic starting points

If you have any questions, stop by the store, email or call. We’re here to help. Please let us know if you get some great shots we’d love to see!
Please feel free to leave your comments and suggestions. Have a great 4th of July Holiday weekend from all of us at BCC.

Find a fireworks display on NorthJersey.com’s 4th of July celebrations page.

Tripod
Electronic release (available for most cameras at BCC) or 2 second self timer to eliminate the motion caused by pressing the shutter button.
Manually set your camera ISO to 100 (You do not want Auto ISO)
Lens Choice – Wide Angle Zoom to frame what you’d like to capture
Auto White Balance or Daylight
Set your lens to manual focus then focus to infinity (take a test image and make sure things are sharp)
Set your camera to Manual exposure – Try 5 seconds at f/ 16
Carefully release the shutter if not using a release to capture from one to several bursts
Evaluate your exposure – Shorter exposures (or smaller apertures ) will darken the image and capture shorter trails, Longer exposures (or larger apertures ) will lighten the image and capture longer trails.
Evaluate sharpness by zooming in on your image – adjust as needed

If you are using a point a shoot, check your camera’s manual for fireworks mode.

Improving Fireworks photos
Shoot with a tripod – it will give a more natural cascade of light

Shooting the Finale!
The finale is many times brighter than rest of the show. Be ready to choose a shorter exposure or smaller aperture to prevent overexposure. The exposure you need is dependent on the number of simultaneous bursts. In some really incredible finales I’ve found myself shooting at 1/4 or 1/8th of a second. Experiment for best results.

Why use a tripod?

Hand-held image above shows motion from camera shake in the burst of light.

The image below is steadied by a tripod, 5 seconds, f16 at 100 ISO

Other Techniques
Set your camera to B and lock open your shutter – keep the lens covered with a dark hat and remove the hat to capture a burst then recover and repeat to capture several bursts. Just be careful not to bump your camera.
You can even zoom the lens during exposure for some interesting effects

Experiment and best of all have fun

Gallery images below shot mainly at 5 seconds, f16 at 100 ISO

Print IT!

Here’s the simple math on “megapixels”

3 will make an outstanding 8 x 10 print

6 to crop deep inside a Jpeg for making an outstanding 8 x 10 print

Jpegs from a 2 megapixel camera average 1 MB

Jpegs from a 12 megapixel camera can be over 10 MB

Pictures posted on Facebook are no more than 150 KB (unless you choose the high resolution slower option)

Eye-popping photography does not jump off the wall until it is printed! 🙂

Printed Anne – Nikon D300, DX 85mm Micro-Nikkor VR f/3.5 lens (great for portraits too!), ISO 800, f/8 at 1/30 sec, 8.62 MB Jpeg ‘Fine’ cropped in Photoshop to 8″ x 10″ at 300dpi (5.02 MB)

Full-Frame Anne – Nikon D700, Nikkor VR 28-300mm G f/3.5-5.6 lens, ISO 800, f/8 at 1/10 sec, 9.06 MB Jpeg ‘Fine’ re-sized in Photoshop 720px x 478px at 72dpi (133 KB) for this electronic conversation

Snow – Photographing Winter’s Majesty

The weekend’s precipitous frozen flurry presented a wondrous opportunity to capture the majesty of winter’s cloak. Armored in boots, cap and gloves, I marched into the white of Sunday morning’s golden light with my Nikon D-SLR and a spare battery, of course, warm and snug in the pocket of my Gortex jacket!

Strong diagonal rays and shadows accentuate a classic winter scene.
Winters Majesty
©Franklin Viola

IPTC Data: Nikon D2Xs, Nikon 12-24 at 12mm, ISO 200, f/8 at 1/125sec (Manual mode), Tripod

Emphasizing powder coating with ‘close-focus wide-angle’ imaging

Snowy Bench
©Franklin Viola

IPTC Data: Nikon D2Xs, Nikon 12-24 at 22mm, ISO 200, f/5.6 at 1/250sec (Manual mode)

Selective framing to contrast ‘icons’ of  hot and cold
Chimney - Icicles - Contrail
©Franklin Viola
IPTC Data: Nikon D2Xs, Nikon 24-120 at 105mm, ISO 200, f/8 at 1/320sec (Manual mode), Tripod
Have a question about winter photography? Please leave a comment, email, visit the store or visit our Winter shooting tips on our blog.

Lunar Photography – getting the correct exposure

Man in the Moon
"Man in the Moon" taken during a partial lunar eclipse

Next Full Moon – March 29, 2010 

I recently had a customer ask me the best way to photograph the moon. It seems that they never could see any detail in the moon (overexposed) and the overall image was dark.  First, the moon is much brighter and takes up a small portion of the image – the camera meter gets fooled since it sees all the darkness and sets an exposure that washes out the moon. Second the variation between light and dark values is beyond what your camera is capable of capturing in a single shot. We’ll talk about a fix to this problem later on . . . a little trick that involves using an imaging program like Photoshop Elements.   

To capture the full “Man in the Moon” effect is easy to do by setting your camera manually to expose for the moon.  We set the camera manually because your camera’s metering system usually gets fooled.   Setting your camera manually eliminates this exposure error – the moon is always lit with the same intensity with the exception of solar eclipses.  

For the complete “Man in the Moon” look, we suggest the following exposure – ISO 100 -1/125th second @ f/11When the moon is not full it is also very easy to get your exposure. Since a half moon is half as bright you just need to open your lens up by one more stop which lets twice a much light in – ISO 100 – 1/125th second @f/8. Using the same convention a 1/4 moon would require 4x as much light as the full moon or 2 stops more light and a setting of  1/125th second @ f/5.6. A tripod is always a great option for the sharpest shots especially when using a telephoto lens.   

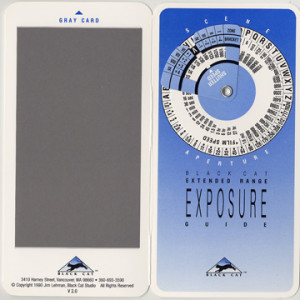
Black Cat Exposure Guide
A Black Cat exposure guide (pictured above) is a great tool that lists manual exposure settings for more than 100 scenes. Just choose your scene – line up the scene code to your ISO and just set your camera to one of the displayed f-stop and shutter speed combinations. The Black Cat Exposure Guide is a must for anyone into time exposure and existing light photography. We stock the Black Cat Exposure Guide in Westwood & Englewood.  

Getting both the moon and your scence exposed correctly in the same image is easily accomplished by compositing a properly exposed image of the moon with a properly exposed night scene in a program like Photoshop Elements. 

Questions – Stop by, email or give us a call.  Comments? Let us know if you liked this post. What other things you would like tutorials about?