Photography is the art of capturing a moment. Light and time caught and preserved for the enjoyment of all. While I can easily describe the amount of time it took to take a photograph, (in the accompanying photo 1/800th of a second) describing the amount of light is a little more complicated.
Your lens features a system which controls the light entering your camera. Much like the pupil of a human eye shrinks and grows depending on how much light is entering the eye, the lens has aperture blades which shrink the opening of the lens so the right amount of light enters for proper exposure. When we describe how much light is used in creating an image, we describe how much light is entering the lens, known as the f-stop, through the opening of the lens, the aperture. The lower the f-stop number, the higher the amount of light entering the lens. So an f-stop of 1.8 is letting in more light then an f-stop of 5.6.
Varying apertures can have dramatic effects on your photographs. Changing the aperture of your photos will both alter the depth of focus in your photos as well as the minimum shutter speed for proper exposure. Depth of focus is how far into your photo objects appears clear. When I use an aperture of f/1.8(lots of light entering the lens) objects in the foreground and background of where I focus will appear soft or blurry. Oppositely if I use an aperture of f/32(little light is entering the lens), both the subject I focus on, as well as both the foreground and background will be in focus.
When shooting in low light environments, changing the aperture of the lens to allow as much light in as possible will result in a quicker shutter speed and a sharper image. This often allows for taking photos without a flash even when there is low light. In landscape photography, changing the aperture will allow an increased depth of field and more subjects in focus.
Lenses can have either a fixed or variable aperture. In variable aperture lenses, the maximum aperture changes depending on what focal length you’re using, or how far you’ve zoomed your lens.
Finding the Aperture of a Nikon 18-55mm lens
To find the aperture of your lens, we’ll take a look at a Nikon 18-55mm lens. Look at the front of the lens. There is a sequence of numbers on the front of the lens telling you the focal length of your lens (18-55mm) and a ratio showing the aperture (1:3.5-5.6). This is telling you that your lens is a variable aperture lens where the lowest possible aperture of your lens is f/3.5 at the shortest focal length (18mm) and f/5.6 at the furthest focal length (55mm).
In taking both portraits and everyday photos, low aperture lenses can make your photos much more interesting at a low cost.
Confused or want to learn more? Visit Bergen County Camera to learn more about aperture, lenses, and other ways to improve your photography.
Bergen County Camera employee and photography expert Alan Schwab recently hosted our focus session on fireworks photography and created this tip sheet!
1. Set your camera to Bulb Mode. If there is no Bulb mode on your mode dial, check in Manual Mode. Change the shutter speed to the longest possible (Often switches from 30 seconds to “Bulb”). In Bulb Mode, the shutter will stay open as long as you hold down the shutter release.
2. Use a Low ISO. (100 or 200)
3. No Long Exposure Noise Reduction, high ISO NR can stay on but is not needed.
4. Set your Aperture between f/8 and f/11
5.Set your White Balance to Auto
6. No Mirror Lock Up
7. Focus your lens manually on infinity. Test where infinity is by focusing on the furthest possible object your lens can resolve sharply.
8. No Dynamic Lighting or Auto Light Optimizer
9. Vivid color mode, leave saturation at normal, landscape (picture style) for Canon users.
10. Turn the Image Stabilizer (IS or VR) off
11. Metering – Matrix or evaluative
12. You will not need to meter anything while shooting. (f/11, Bulb mode, ISO 100)
13. Tripod, short zoom lens 18-70, 24-70, 18-105, 18-140, 24-105, cable release (No need to lock)
14. Tripod will possibly need to be re-positioned (tilt etc.) once show starts. I’ll shoot vertical more often then horizontal.
15. Vary your focal length for composition
16. Fire Shutter (Cable Release) hold rather then lock. Hold for multiple bursts. (2-up to 8 maybe more) Check monitor, exposures should average 2-4 seconds although exposures can last up to 15 seconds. Disregard the histogram.
17. Finale shots need to happen quicker then the rest of the show. These shots can become over exposed quickly due to the number of fireworks exploding. Shutter speeds during the finale can range between 1 second and – 1/30th of a second.
18. JPEG or RAW format. RAW is not necessary unless you feel the need to recover highlights. Shoot JPEG or RAW together or just JPEG. Use a fast card for recovery of write speed times. Raw will offer more color bit information.
19. Bring extra cards, batteries, mini flashlight. The show may be 30 minutes to an hour long. Be careful inserting a memory card in the dark.
20. Add an element of scenic interest to your pictures. Look for a location which has a bridge, skyline, or crowd.
As always, if you have any questions about this or any other photographic subject, feel free to stop by, give us a call, message us on facebook, or comment below.
Looking to take a great photo of Dad? Indoors or outdoors, we’ve got some tips to improve your images.
Outdoors portraits require attention to light. Watch for irregular shadows on your subjects. Remember to use your flash to fill in the shadows, even if you’re outside in daylight. This is especially important if Dad is wearing a hat.
Use Aperture Priority on your camera to blur out the background in your images. This creates a less distracting and pleasant background for your subject. The lower your f-stop, the more background blur. But pay attention to your shutter speed. Adjust ISO to keep your shutter speed between 1/60th and 1/2000th of a second.
Indoor flash photography is tricky. Harsh shadows can become distractions in flash photography. Use a flash diffuser. Diffusers soften the light produced by flashes and create visually pleasing images. Also try bouncing your flash off the ceiling. This will move the shadows closer to the ground and usually out of your images.
Remember that some of the best photos you will take of your family is of them acting naturally. Don’t wait for everyone to get together and post to take your photo. Take some photos throughout the day.
Graduation Photos:
Outdoors or indoors, the right lenses go a long way. Indoors use a lens with a low aperture. We rent several 70-200mm f/2.8 lenses for both Nikon and Canon cameras. This lens is ideal for indoor, low light shooting. When shooting outdoors, aperture is less of a factor. You’d be better with a lens giving you more distance. We rent a Canon 100-400mm and a Tamron 200-500mm lens for Nikon which would be ideal for outdoor graduation ceremonies.
If you’re taking blurry photos, raise your ISO. ISO is the sensitivity of your camera’s sensor to light. Make sure your shutter speed is at least 1/60th of a second. The higher the shutter speed, the less motion blur in your photos.
Practice makes perfect. Prepare yourself for the diploma transfer photo by practicing taking photos of earlier students making their walk.
Take your time. The leading cause of bad photos is panic and excitement. Take your time, focus your self, focus your camera, and take the right photo. Yes, burst mode is wonderful, but one great photo is better then a dozen blurry.
Have questions? Stop in to Bergen County Camera and let us help you become the photographer you want to be.
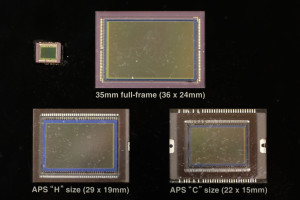
There is a misconception about digital photography that the more megapixels, the better the image quality. Most people don’t realize that image quality has to do with both the amount of pixels and the size of the image sensor.
Sensors from different types of cameras. Top left – Typical Point and Shoot Sensor Top Center – Full Frame Sensor Bottom Left – APS-H Sensor Bottom Right – APS-C Sensor
The image sensor in a camera is the digital equivalent of film. Light comes through the lens and hits the image sensor, where millions of pixel wells capture what color of light is entering that location. The larger the sensor size, the larger the pixel wells, the more accurate the information. The higher the megapixel, the more pixel wells, resulting in higher image resolution. Do not confuse image resolution with image quality. The size of the image sensor affects the amount of noise, the depth of focus, and the overall sharpness of the image.
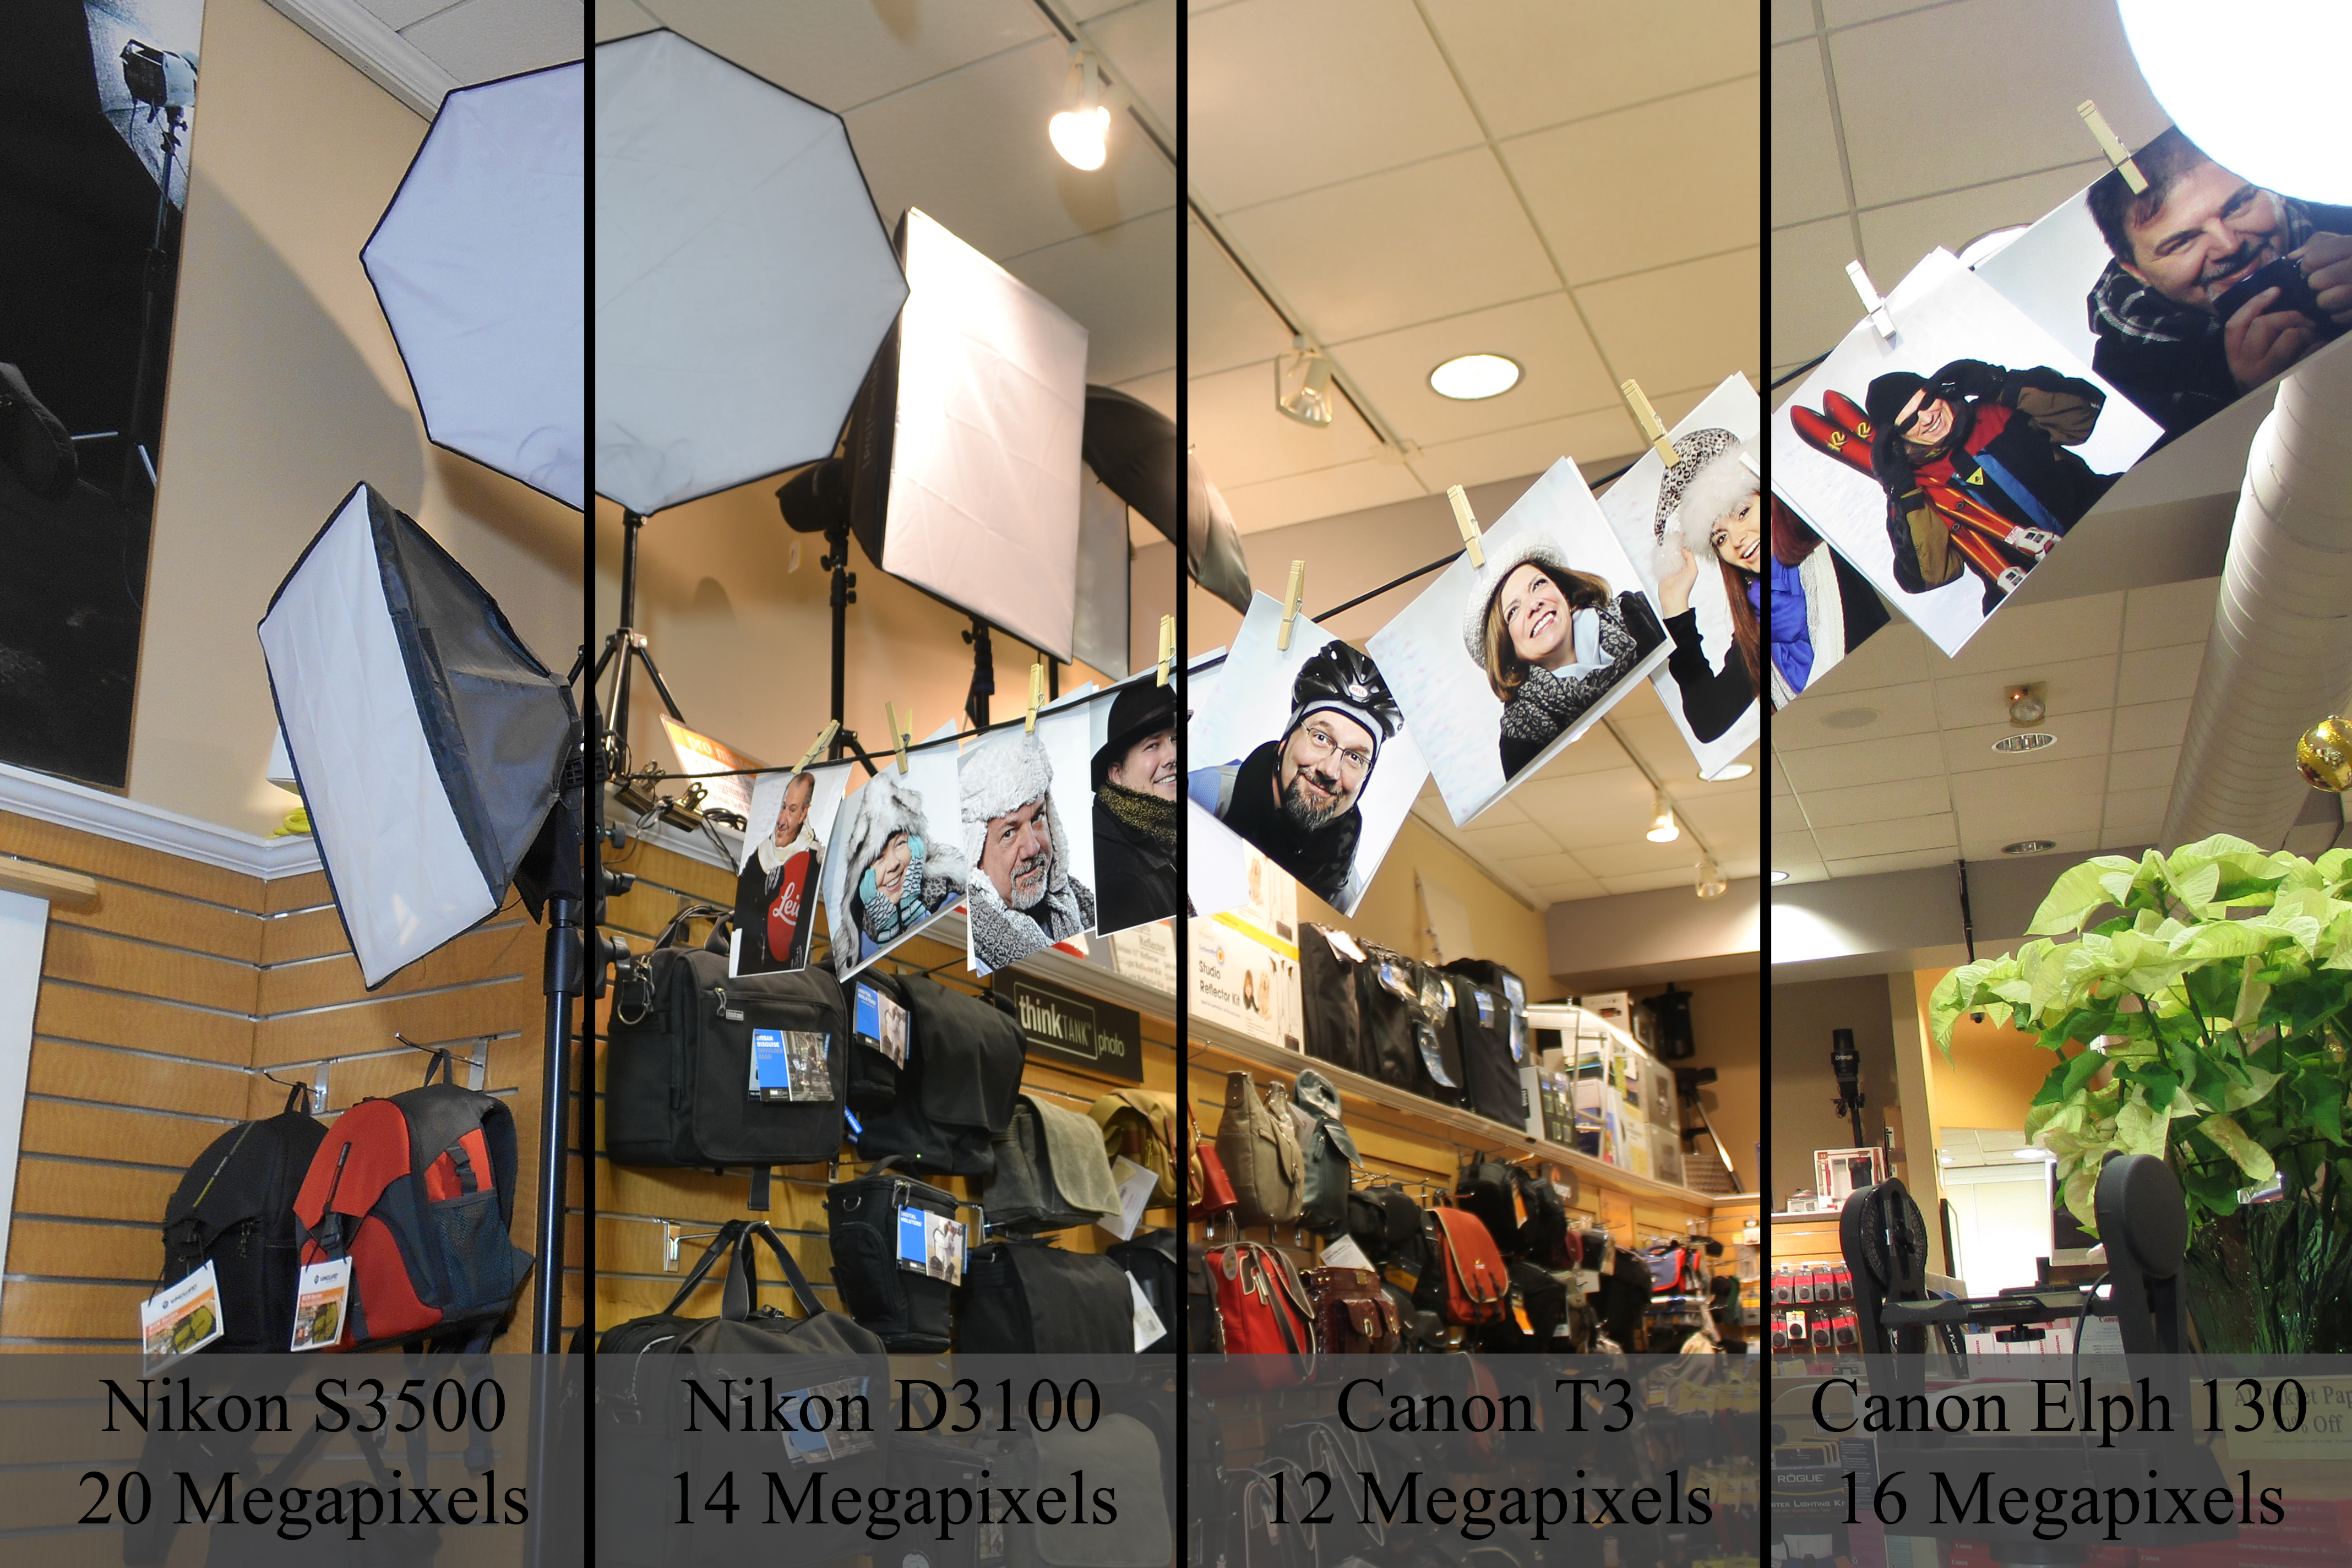
In the photos, we see four different sensor sizes. There are currently around ten different image sensor sizes. We also see the difference in image performance based upon sensor sizes. This comparison shows two high megapixel point and shoot cameras and two lower megapixel SLR cameras. All the photos were shot with near identical camera settings at ISO 100. The images using SLR cameras were shot with their normal kit lens, the 18-55mm f/3.5-5.6. Immediately you can see a difference in clarity, noise, and color.
Comparing High Megapixel Point and Shoot Cameras (Nikon S3500 and Canon Elph 140) with Lower Megapixel SLR Cameras (Nikon D3100 and Canon T3)
So why should you buy a camera with a smaller sensor?
Well, the smaller the sensor, the smaller the camera. It’s definitely convenient to own a camera which fits in your pocket. Plus cameras with smaller sensors can have much greater zoom lengths in an easy, portable size. Current Point and Shoot cameras are still performing better then current cellphones due to the size of their sensors. Point and Shoot Cameras have sensors varying between 1/2.3-inch and Apple iPhone 5s has a sensor which is 1/3-inch. Plus, Point and Shoot cameras have real zoom lenses. Cell phones use digital zoom, which degrades your image quality.
Realize that the larger the camera you carry, the better the image quality. If you are someone looking for quality, look into SLR cameras. Looking for help finding which camera is right for you? Check this post here.
The weather outside is frightful, but the pictures can still be delightful. Online tips not your favorite way of learning? Stop in Saturday, December 21st for our Focus Sesson, “Winter Photography”.
We’ve compiled several previous blog posts filled with tips and tricks to get the best out of your camera this winter.
Shooting in the winter (especially when snowing, sleeting or below freezing) can certainly be a challenge.
Here are a few pointers to make your winter shooting that much easier.
Batteries – The number of frames you can take can drop dramatically the colder it gets especially below 30. When you plan on shooting outside for an extended period of time keep one or two spare batteries in a coat or pants pocket that is warm and close to the body. As soon as your low battery indicator flashes stop shooting and rotate a warm battery into the camera.
Rain, Sleet and Snow – Always keep an inexpensive plastic bag in the bottom of your camera bag. If you get caught out in precipitation simply put your entire camera bag inside and make your way back. If you need to shoot in rain, sleet, or snow you can always purchase an Aquapac or any protective rain-sleeve to protect your camera and lens from damage.
Polarizing Filters – Great for reducing glare especially off of snow and glass. Colors always look better when glare is reduced. Don’t stack your filters and remember to remove your polarizer when it gets darker or you move inside. Always remember – a polarizer can cut the amount of light entering the lens in half ( 1 f-stop).
Hand Warmers – this years addition to the list comes from outdoor sports enthusiasts. Available at most sporting goods stores and for about $2 can keep your hands warm for 4 – 6 hours. Special versions are available to keep your toes warm as well.
Why are my snow pictures dull grey?
Here’s the first in some winter picture taking tips that we are putting together. A common complaint we hear when people bring their winter pictures in is – “my pictures look dull,” “the snow looks grey, not white.” Read on for the short and the long answer.
The picture you see is the one above with white snow . . .
The picture your camera captures has grey snow as shown below.
So the question is – How do I get white snow?
The short answer is you need to overexpose by using the Exposure Compensation +/- feature on your camera. Using the exposure compensation automatically makes this adjustment so your camera still can remain fully automatic. In the case of a Nikon you would press the +/- button while rotating the control wheel until +1.0 shows in the display. Your owners manual will explain this in detail or feel free to stop by the store to learn how to make the settings on your camera. Be sure to take some test shots so you get the hang of how this works. If less of your image is taken up with the snow you can try the + 0.7 or + 0.3 setting to reduce the brightening effect.
After taking your snow photos just remember to turn the exposure compensation +/- back to zero.
The more technical answer
This is all caused by a camera’s meter system which is designed to see “18% grey” ( the solid gray image to the left ). Essentially anytime you take a picture that is predominantly white or black the camera will make the wrong exposure. Since the cameras meter can only see grey, an “average scene”, we only need to make adjustments when our scene is predominantly white or black. Luckily 98% of what most of us shoot are scenes with average lighting values and need no adjustment.
Predominantly white scenes ( think Snow, white sand beaches, clouds )will be moved toward grey so we must over expose from .5 – 1.5 stops to get true white by using the +/-.
Predominantly black scenes ( think black cars, black buildings, black sand beaches )will be moved toward grey so we must under expose .5 – 1.5 stops to get true black by using the +/-.
A future tutorial will explain how to get perfect exposures using a grey card.
Using histograms to further understand
For those familiar with histograms we can further look into diagnosing our exposure. The histograms are shown below with both our camera exposure and with exposure compensation set on + 1.0. Histograms are available in almost any digital camera including point and shoots and most imaging programs like Photoshop Elements.
A histogram is just a map of the tonal values in our image from black (left most point) to white (right most point) with the height representing how much of the image is at a particular level of brightness. Your histogram will look the same in camera and when you open that image up in your imaging program.
^Black Middle^Grey White^
In the grey snow example above our histogram has a good deal of room before the white point on the right so the image represented by this histogram is a shade of grey not white. By overexposing one stop ( +/- +1.0) the camera automatically adjusts and allows 1 extra stop or twice the amount of light. As you can see from the histogram below we still have a small amount of room before the white point (this room indicates we have not blown out our highlights. If this histogram started all the way to the right and did not build to a peak, this would indicate over exposure and blown out highlights. The fix would be to reduce the exposure compensation from +1.0 to +0.7 and check again. The peak will move to the left each time you reduce your exposure. More on histograms in an upcoming tutorial.
What to Do With Christmas Lights
Whether you’re trying to get the perfect shot of your decorated home, taking family photos in front of the tree, or using the lights to get an interesting photo, Christmas Lights can be tricky to photograph. Each situation requires different gear and a different camera set up.
Photographing Your Home
With photos of homes lit by Christmas lights, you’re going to want a closed down aperture, a slow shutter speed, and a low ISO. With a closed down aperture(F/11, f/16), you’ll get plenty of depth of focus so everything from your windows to the trees in the distance will be in focus. The slow shutter speed will allow you to properly expose your image, and the low ISO will keep noise in your photo to a minimum. Because your shutter speed with be slower then 1/60th of a second, you’re going to need a tripod to hold the camera steady. For a unique look, try throwing a colored gel on your flash and setting it off once during the photo.
Photographing your Family In Front of Christmas Lights
To take the best photos involving both your family or another subject in front of Christmas lights involves using a flash. Place the camera on a Tripod and set the flash to rear curtain sync. This will fire the flash at the end of your photo. Allowing a slow shutter speed to expose the lights, then the flash to illuminate your subject in the front of the image. To join the picture, use a wireless remote or set the camera to a 10 second delay.
Using Christmas Lights to Create An Interesting Photo
BCC Employee Juline Moreland’s creative recycling of film canisters says both “Happy Holidays” and “Don’t Forget Your Camera”.
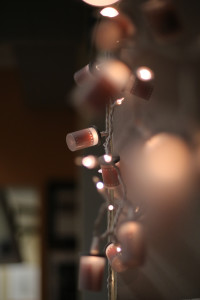
One of my favorite aspects of Christmas lights, are how they look when they fall out of your depth of focus. Each small bulb becomes an otherworldly glowing ball of light. Use a lens with a wide aperture (f/1.8, f/1.4) to allow only a sliver of focus in your image. Thus creating an interesting and beautiful background to your subjects.
We hope you’ll enjoy this beautiful weather, but remember to stay safe. Should you have any questions of comments feel free to stop in at Bergen County Camera, comment on this post, or message us on our Facebook page.
Frustrated? Confused? Wondering why that picture just doesn’t look anything like you were hoping it would?
We are here to help.
Getting the best out of your camera always takes a bit of knowledge and some preparation. Photography can be overwhelming and frustrating at times, but really there are only three important elements of digital photography: Shutter Speed, Aperture, and ISO. Once you gain a basic understanding of these three elements, you will find your pictures are vastly better. These three elements are connected in the camera, and changing one of the elements will effect the other two.
If at any point in reading this you get overwhelmed or confused, you can always stop in or call Bergen County Camera to ask questions.
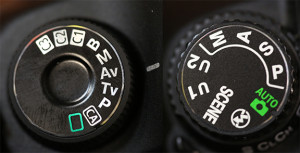
Camera Modes
Mode Dials of a Canon 5D Mark II (Left) and a Nikon D7000 (Right)
Most cameras have five modes: Auto, Program, Shutter Priority, and Aperture Priority, and Manual. Some cameras only have two modes: Auto and Program. Many cameras have additional modes, but these are auto modes which often do not help you take better photos. In each of these modes you are controlling one or more elements of photography.
Auto – the camera controls everything. While this is the easiest mode to use, it is also the most likely to give you blurry images.
Program – Allows adjustment of the ISO.
Shutter Priority – Allows adjustment of the ISO and shutter speed.
Aperture Priority – Allows adjustment of the ISO and aperture.
Manual – Allows adjustment of the ISO, shutter speed, and aperture. This is the most difficult mode to use because you must use the meter in the camera to find the correct exposure for your picture.
Rear screen of a Canon G11. Often this information can be found by activating the autofocus on your camera. (pressing the shutter button down half way)
Shutter Speed
Every time you press your shutter button and take a picture, a window opens inside your camera, exposing the area which creates the image, the sensor, to light. The less time the sensor is exposed, the less motion you see in an image. Shutter speed is shown as a fraction of a second. In the image below, the shutter speed in the red box is 1/20th of a second. This is telling you that the window inside the camera will open and then close 1/20th of a second later.
The average person, holding a camera still needs a shutter speed quicker then 1/60th of a second to get a clear, non-blurry image. If the shutter speed is slower then 1/60th of a second, you need to change either the Aperture or ISO.
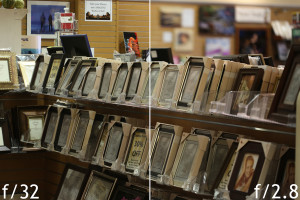
Aperture
Depth of Focus variation from adjusting the camera’s Aperture
Aperture describes the amount of light passing through the lens into the camera. All lenses are marked with a maximum aperture, weather it’s on a point and shoot or an SLR. The aperture is also known as the f-stop. In the image below, within the blue box shows an aperture of “F2.8”. The lower the f-stop, the more light that is entering the camera. The more light entering the camera, the quicker the shutter speed can be to give you correct exposure.
The aperture also controls your depth of focus in an image. If you are looking to have your subject in focus, but the background blurry, you need a low aperture lens and a low aperture set on the camera. When a photographer talks about stepping a lens down, he is describing shooting at a higher f-stop. The higher the f-stop, the less light entering the lens, and the greater your depth of focus becomes. This is what you would do if you were shooting a landscape image where everything from the grass to the mountains to the clouds was in focus.
ISO
ISO is the sensitivity of the sensor of the camera. The higher the ISO, the more sensitive the camera is to light, and the quicker the shutter speed can be to give you a correctly exposed image. In the image below, in the yellow box, the ISO is set to 800. For those wondering, ISO stands for International Organization for Standardization. When you shoot at higher ISO settings, you are likely to see more noise in your images. Noise is a speckling of randomized color in your image. The lower your ISO, the less noise you get. However, the lower your ISO, the slower your shutter speed needs to be to get a correctly exposed image.
Bring It All Together
So your image is blurry. This occurs when your shutter speed isn’t quick enough. In order to raise your shutter speed, you need to either raise your ISO or set your aperture to a lower f-stop. Making your sensor more sensitive or allowing more light into the camera will allow you to shoot at a high enough shutter speed to take a clear image.
Keep in mind that 1/60th of a second is the magic number in most situations, however if you are shooting sports, dancing, or any other high motion activity, you may need a shutter speed upwards of 1/1000th of a second.
Still Unable to Get a Clear Image?
In some situations, your camera will be unable to obtain a shutter speed quick enough to get a correctly exposed image. I have run into this issue at concerts where lighting is incredibly low. I prefer a clear image which is underexposed over a blurry image which is correctly exposed, then restoring correct exposure using photo editing software. Shooting Manual, I will set my shutter speed to 1/60th of a second through 1/250th of a second. Next I’m setting the aperture to as low an f-stop as possible, thus letting in as much light as possible. And finally I’m setting my ISO as high as I can, without having too much noise. Find this setting before the concert by taking photos in a low lit area and raising your ISO between shots. RAW image format is extremely useful in this situation. RAW is an uncompressed image format which retains more information about the image for editing. In a RAW processor such as Adobe Lightroom, you can raise an image’s exposure back to correct level. This is a difficult process, but if you’re stuck in a bad lighting situation, you need to be able to adapt.
Still have questions? Still feeling lost?
We are here to help you enjoy photography. Stop by Bergen County Camera in Westwood. We offer classes, private tutorials, and trips to help you enjoy your camera.
The best photographic time of the year is on our doorstep. With the trees starting to change and the temperatures getting comfortable, there’s no better time to get that camera out. We’ve got some tips for getting the best out of your camera this fall.
1. Use the right filters
A polarizing filter is a “must have” for great digital fall foliage pictures. A polarizer creates dramatic fall foliage pictures by darkening the sky, increasing contrast, deepening colors, and removing the sheen from the leaves. With digital photography, colored filters from the film days are not needed but filters designed to enhance reds and oranges, and graduated effects can really add drama to your foliage photography. Your standard protective UV filter should be removed before putting your polarizer on – never stack filters. Also, don’t forget to remove your polarizer when you move back inside, as it reduces light by one to two f-stops. Shop Polarizers in our online store.
The other “must have” filter for great fall foliage pictures is a variable neutral density filter. These filters reduce light entering the lens, allowing you to use slower shutter speeds to gain motion to your photos. Combining a neutral density filter with a tripod allows you to take beautiful images where leaves swirl in color. These filters are even more vital when shooting fall images with water or waterfalls. Slower shutter speeds make water appear smoother and cleaner. Shop Variable Neutral Density Filters in our store.
Other useful filters include Color / Neutral Graduated filters and Enhancing filters. Color / Neutral Graduated filters utilizes a color (or gray) that gradually diminishes from dark to light across the filter. These filters are often used to deepen the sky or to balance the exposure between foreground and background, which helps you keep the sky blue rather than washed out. A third type of filter is an enhancing filter which does just what the name implies – enhances. This filter is especially effective with the bright primary colors of autumn (reds, oranges and browns).
2. Pay attention to the weather
Nothing takes away from foliage more than a bright white overcast sky. In these situations, try to reduce the amount of sky in your images or use a Neutral Graduated filter. Dramatic storm clouds of autumn thunderstorms interspersed with blue sky make a stunning backdrop for the brilliant colors of fall, especially when the vivid colors are brought out with a polarizing filter.
3. Use a tripod
For the sharpest possible image, having your camera stable allows an ISO of 100 or 200. Since the camera will be stable, a quick shutter speed is no longer a necessity. Tripods are a necessity when shooting photos of waterfalls or waves. Remember to use a remote release or self timer to prevent motion when pressing the shutter. Shop Tripods in our store.
4. Shoot in the “magic hour”
Colors are warmer and can be more dramatic closer to sunrise and sunset. The hour before and after sunrise and sunset are considered by many to be the “magic hours” where you get an amazing quality of light.
5. Experiment and take lots of pictures
Since you are shooting more with your digital camera, you’ll be able to edit out some images before showing off your work to family and friends. You can find some beautiful and unique pictures at different angles. Try to photograph your subject from several different angles.
6. Once you have your great picture, have us turn it into something special
Different types of paper can have huge effects on the quality of your photograph. We print on dozens of different paper types, metallic paper, wood, and metal. Stop in to discuss which of these would be best for your picture or Order prints online.
7. Above all have fun!
It’s beautiful out there. The trees are only part of what makes fall one of the best times of the year. Temperatures are finally comfortable. Find somewhere special with the people you love and make some memories.
Fall Foliage Websites and Hotlines
Once you’ve assembled your camera and a few filters, all you’ll need is foliage at the peak of color. We’ve assembled a list of state hotlines below to help schedule your trip.
The Foliage Network – website with frequent updates and color maps of the northeastern United States.
State by State foliage websites – click on your state of interest below.
Remember to visit Bergen County Camera in Westwood, NJ for filters, tripods, lenses, cameras and prints. Need some ideas for places to shoot, be sure to visit Bergen County Camera’s Where to take great Pictures page. Have some suggestions of your own? Comment on this post, Like and Message us on Facebook, or E-mail us!
Here’s a quick tip to get great photos from your iPhone or Android device. The number one issue we see at our imaging counter when customers want to make an enlargement from their smartphone is a blurry image . . . and preventing this is easy. Smartphone cameras have improved dramatically and can take some fantastic shots but the lens must be clean. Since we often keep our phones in a pocket or purse the lens often get smudged and dirty. Carry a lens cleaning cloth and clean your lens before taking photos (even a shirt can work in a bind).
Here are some before and after shots take with an iPhone 4s before and after cleaning. Thanks to our Special Projects Manager Abby for the before and after photographs taken with an iPhone 4s.
Be sure to join us for iPhone Photography Free Saturday Focus Session – September 21
Your comments are welcome – do you have iPhone questions or suggestions you’d like to share? Let us know. Commenting now works.
Where to photograph fireworks – these links will be updates as we get closer to July 4th.
North Jersey’s parade, firework and celebration map List of North Jersey fireworks, times and dates
Here are some basic starting points
If you have any questions, stop by the store, email or call. We’re here to help. Please let us know if you get some great shots we’d love to see!
Please feel free to leave your comments and suggestions. Have a great 4th of July Holiday weekend from all of us at BCC.
Find a fireworks display on NorthJersey.com’s 4th of July celebrations page.
Tripod
Electronic release (available for most cameras at BCC) or 2 second self timer to eliminate the motion caused by pressing the shutter button.
Manually set your camera ISO to 100 (You do not want Auto ISO)
Lens Choice – Wide Angle Zoom to frame what you’d like to capture
Auto White Balance or Daylight
Set your lens to manual focus then focus to infinity (take a test image and make sure things are sharp)
Set your camera to Manual exposure – Try 5 seconds at f/ 16
Carefully release the shutter if not using a release to capture from one to several bursts
Evaluate your exposure – Shorter exposures (or smaller apertures ) will darken the image and capture shorter trails, Longer exposures (or larger apertures ) will lighten the image and capture longer trails.
Evaluate sharpness by zooming in on your image – adjust as needed
If you are using a point a shoot, check your camera’s manual for fireworks mode.
Improving Fireworks photos
Shoot with a tripod – it will give a more natural cascade of light
Shooting the Finale!
The finale is many times brighter than rest of the show. Be ready to choose a shorter exposure or smaller aperture to prevent overexposure. The exposure you need is dependent on the number of simultaneous bursts. In some really incredible finales I’ve found myself shooting at 1/4 or 1/8th of a second. Experiment for best results.
Why use a tripod?
Hand-held image above shows motion from camera shake in the burst of light.
The image below is steadied by a tripod, 5 seconds, f16 at 100 ISO
Other Techniques
Set your camera to B and lock open your shutter – keep the lens covered with a dark hat and remove the hat to capture a burst then recover and repeat to capture several bursts. Just be careful not to bump your camera.
You can even zoom the lens during exposure for some interesting effects
Experiment and best of all have fun
Gallery images below shot mainly at 5 seconds, f16 at 100 ISO