The weather outside is frightful, but the pictures can still be delightful. Online tips not your favorite way of learning? Stop in Saturday, December 21st for our Focus Sesson, “Winter Photography”.
We’ve compiled several previous blog posts filled with tips and tricks to get the best out of your camera this winter.
From “Winter Shooting Tips“
Shooting in the winter (especially when snowing, sleeting or below freezing) can certainly be a challenge.
Here are a few pointers to make your winter shooting that much easier.
Batteries – The number of frames you can take can drop dramatically the colder it gets especially below 30. When you plan on shooting outside for an extended period of time keep one or two spare batteries in a coat or pants pocket that is warm and close to the body. As soon as your low battery indicator flashes stop shooting and rotate a warm battery into the camera.
Rain, Sleet and Snow – Always keep an inexpensive plastic bag in the bottom of your camera bag. If you get caught out in precipitation simply put your entire camera bag inside and make your way back. If you need to shoot in rain, sleet, or snow you can always purchase an Aquapac or any protective rain-sleeve to protect your camera and lens from damage.
Polarizing Filters – Great for reducing glare especially off of snow and glass. Colors always look better when glare is reduced. Don’t stack your filters and remember to remove your polarizer when it gets darker or you move inside. Always remember – a polarizer can cut the amount of light entering the lens in half ( 1 f-stop).
Hand Warmers – this years addition to the list comes from outdoor sports enthusiasts. Available at most sporting goods stores and for about $2 can keep your hands warm for 4 – 6 hours. Special versions are available to keep your toes warm as well.
From “How to Get White Snow“
Why are my snow pictures dull grey?
Here’s the first in some winter picture taking tips that we are putting together. A common complaint we hear when people bring their winter pictures in is – “my pictures look dull,” “the snow looks grey, not white.” Read on for the short and the long answer.

The picture you see is the one above with white snow . . .

The more technical answer

Using histograms to further understand
A histogram is just a map of the tonal values in our image from black (left most point) to white (right most point) with the height representing how much of the image is at a particular level of brightness. Your histogram will look the same in camera and when you open that image up in your imaging program.
![]()
^Black Middle^Grey White^

In the grey snow example above our histogram has a good deal of room before the white point on the right so the image represented by this histogram is a shade of grey not white. By overexposing one stop ( +/- +1.0) the camera automatically adjusts and allows 1 extra stop or twice the amount of light. As you can see from the histogram below we still have a small amount of room before the white point (this room indicates we have not blown out our highlights. If this histogram started all the way to the right and did not build to a peak, this would indicate over exposure and blown out highlights. The fix would be to reduce the exposure compensation from +1.0 to +0.7 and check again. The peak will move to the left each time you reduce your exposure. More on histograms in an upcoming tutorial.

What to Do With Christmas Lights
Whether you’re trying to get the perfect shot of your decorated home, taking family photos in front of the tree, or using the lights to get an interesting photo, Christmas Lights can be tricky to photograph. Each situation requires different gear and a different camera set up.
Photographing Your Home
With photos of homes lit by Christmas lights, you’re going to want a closed down aperture, a slow shutter speed, and a low ISO. With a closed down aperture(F/11, f/16), you’ll get plenty of depth of focus so everything from your windows to the trees in the distance will be in focus. The slow shutter speed will allow you to properly expose your image, and the low ISO will keep noise in your photo to a minimum. Because your shutter speed with be slower then 1/60th of a second, you’re going to need a tripod to hold the camera steady. For a unique look, try throwing a colored gel on your flash and setting it off once during the photo.
Photographing your Family In Front of Christmas Lights
To take the best photos involving both your family or another subject in front of Christmas lights involves using a flash. Place the camera on a Tripod and set the flash to rear curtain sync. This will fire the flash at the end of your photo. Allowing a slow shutter speed to expose the lights, then the flash to illuminate your subject in the front of the image. To join the picture, use a wireless remote or set the camera to a 10 second delay.
Using Christmas Lights to Create An Interesting Photo
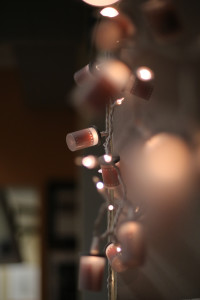
One of my favorite aspects of Christmas lights, are how they look when they fall out of your depth of focus. Each small bulb becomes an otherworldly glowing ball of light. Use a lens with a wide aperture (f/1.8, f/1.4) to allow only a sliver of focus in your image. Thus creating an interesting and beautiful background to your subjects.
We hope you’ll enjoy this beautiful weather, but remember to stay safe. Should you have any questions of comments feel free to stop in at Bergen County Camera, comment on this post, or message us on our Facebook page.