Photography is the art of capturing a moment. Light and time caught and preserved for the enjoyment of all. While I can easily describe the amount of time it took to take a photograph, (in the accompanying photo 1/800th of a second) describing the amount of light is a little more complicated.
Your lens features a system which controls the light entering your camera. Much like the pupil of a human eye shrinks and grows depending on how much light is entering the eye, the lens has aperture blades which shrink the opening of the lens so the right amount of light enters for proper exposure. When we describe how much light is used in creating an image, we describe how much light is entering the lens, known as the f-stop, through the opening of the lens, the aperture. The lower the f-stop number, the higher the amount of light entering the lens. So an f-stop of 1.8 is letting in more light then an f-stop of 5.6.
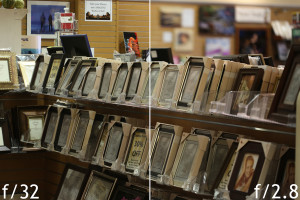
Varying apertures can have dramatic effects on your photographs. Changing the aperture of your photos will both alter the depth of focus in your photos as well as the minimum shutter speed for proper exposure. Depth of focus is how far into your photo objects appears clear. When I use an aperture of f/1.8(lots of light entering the lens) objects in the foreground and background of where I focus will appear soft or blurry. Oppositely if I use an aperture of f/32(little light is entering the lens), both the subject I focus on, as well as both the foreground and background will be in focus.
When shooting in low light environments, changing the aperture of the lens to allow as much light in as possible will result in a quicker shutter speed and a sharper image. This often allows for taking photos without a flash even when there is low light. In landscape photography, changing the aperture will allow an increased depth of field and more subjects in focus.
Lenses can have either a fixed or variable aperture. In variable aperture lenses, the maximum aperture changes depending on what focal length you’re using, or how far you’ve zoomed your lens.
Finding the Aperture of a Nikon 18-55mm lens
To find the aperture of your lens, we’ll take a look at a Nikon 18-55mm lens. Look at the front of the lens. There is a sequence of numbers on the front of the lens telling you the focal length of your lens (18-55mm) and a ratio showing the aperture (1:3.5-5.6). This is telling you that your lens is a variable aperture lens where the lowest possible aperture of your lens is f/3.5 at the shortest focal length (18mm) and f/5.6 at the furthest focal length (55mm).
In taking both portraits and everyday photos, low aperture lenses can make your photos much more interesting at a low cost.
Confused or want to learn more? Visit Bergen County Camera to learn more about aperture, lenses, and other ways to improve your photography.
Nikon, Canon, Leica, Fuji, Olympus, Panasonic, or Sony is only part of the question.
The right digital camera is not the same camera for everyone and with so many choices, finding the right camera can become frustrating quickly. We all look for the camera to be just the right size and to take a good looking image. These two categories can be used to break down your choice for the right camera.
The Right Size
Compact Point and Shoot Cameras are the smallest in size. They are designed to fit in your pocket and function as easily as possible. These cameras are small and convenient, but lack image quality compared to larger cameras.
Super Zoom Point and ShootCameras are larger in size, but do not have changeable lenses. These cameras are convenient and provide extremely large ranges of zoom, but lack in image quality and low light performance. Some Super Zoom Point and Shoot cameras have low aperture lenses, which provide better performance in low light situations.
Compact System Cameras are interchangeable lens cameras which are designed to be smaller in size. They feature a range of sensor sizes from slightly larger then point and shoots to the same size as a Professional SLR.
Consumer SLR cameras are designed to provide better image quality, but are larger in size. With changeable lenses, you have the freedom to improve your camera’s image quality and performance in low light. These cameras require camera bags.
Prosumer SLR cameras are larger then consumer SLR cameras. They deliver higher image quality, quicker burst rates, and improved image quality in low light situations.
Professional SLR cameras are the largest digital cameras. They provide the highest image quality, but are also the largest in size.
The Right Quality
All cameras force us to make a decision between quality and convenience. Large cameras excel in image quality, but carrying a camera bag and additional lenses is inconvenient. Compact Point and Shoot Cameras fit in your pocket, but their image quality is blown away by an SLR. Compact System Cameras are often a nice compromise. They require only a small camera bag and have image quality greatly improved over a Compact Point and Shoot. Check out our article on Sensor Sizes to learn more about the debate of convenience vs. quality.
Built in Lens vs. Changing Lenses
Another aspect of convenience is having one lens built into a camera. While it’s certainly nice to be able to have a long zoom range, there are situations where your lens won’t get you what you want. Changing lenses can get you more zoom, a wider angle, improved low light performance, or a slimmer depth of focus.
One of the more intimidating aspects of photography is understanding what each part of a lenses’ name means. Often intimidation is enough to make most people stick with only the lens a camera comes with or even worse, stay away from cameras with changeable lenses. So I’m going to break down what the name of a common kit lens, the “18-55mm f/3.5-5.6” actually is telling you. The first numbers, 18-55mm, are the focal length. The first number, “18”, is telling you how wide the lens gets. The second, “55”, is telling you how much zoom it gives you. So a “10-24mm” lens gives you more wide angle, but less zoom then an “18-55mm”, and a “70-300mm” gives you far less wide angle, but far more zoom.
The second part of the name, “f/3.5-5.6” is telling you the aperture of the lens. Aperture describes the opening that light comes through on the lens. Learn more about Aperture in our previous post. The lower the number, the greater the amount of light coming through the lens. The more light coming through the lens, the smaller the depth of focus and the quicker the shutter speeds will be. This lens is what’s called a “Variable Aperture Lens”. This means that at the lens’ widest setting, “18mm”, your widest aperture is f/3.5 and at the lens’ maximum zoom, “55mm”, the widest aperture is f/5.6.
As most single lens cameras do not have very wide apertures, their performances in low light situations are not very good. When you invest in a camera, be sure it has a good lens or the ability to improve the lens.
What About Brand?
It certainly would be easiest to say that one brand is better then all the rest, but that simply isn’t true. Whittling down just to the type of camera is difficult. Picking which camera is perfect for you requires getting your hands on several of the cameras in your chosen category. Stop in at Bergen County Camera and we’ll help you choose which camera makes the most sense for you. If you can’t make it in, message us on facebook, or give us a call at (201)664-4113.
Frustrated? Confused? Wondering why that picture just doesn’t look anything like you were hoping it would?
We are here to help.
Getting the best out of your camera always takes a bit of knowledge and some preparation. Photography can be overwhelming and frustrating at times, but really there are only three important elements of digital photography: Shutter Speed, Aperture, and ISO. Once you gain a basic understanding of these three elements, you will find your pictures are vastly better. These three elements are connected in the camera, and changing one of the elements will effect the other two.
If at any point in reading this you get overwhelmed or confused, you can always stop in or call Bergen County Camera to ask questions.
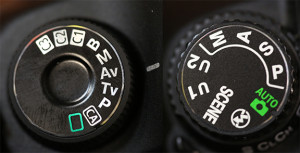
Camera Modes
Mode Dials of a Canon 5D Mark II (Left) and a Nikon D7000 (Right)
Most cameras have five modes: Auto, Program, Shutter Priority, and Aperture Priority, and Manual. Some cameras only have two modes: Auto and Program. Many cameras have additional modes, but these are auto modes which often do not help you take better photos. In each of these modes you are controlling one or more elements of photography.
Auto – the camera controls everything. While this is the easiest mode to use, it is also the most likely to give you blurry images.
Program – Allows adjustment of the ISO.
Shutter Priority – Allows adjustment of the ISO and shutter speed.
Aperture Priority – Allows adjustment of the ISO and aperture.
Manual – Allows adjustment of the ISO, shutter speed, and aperture. This is the most difficult mode to use because you must use the meter in the camera to find the correct exposure for your picture.
Rear screen of a Canon G11. Often this information can be found by activating the autofocus on your camera. (pressing the shutter button down half way)
Shutter Speed
Every time you press your shutter button and take a picture, a window opens inside your camera, exposing the area which creates the image, the sensor, to light. The less time the sensor is exposed, the less motion you see in an image. Shutter speed is shown as a fraction of a second. In the image below, the shutter speed in the red box is 1/20th of a second. This is telling you that the window inside the camera will open and then close 1/20th of a second later.
The average person, holding a camera still needs a shutter speed quicker then 1/60th of a second to get a clear, non-blurry image. If the shutter speed is slower then 1/60th of a second, you need to change either the Aperture or ISO.
Aperture
Depth of Focus variation from adjusting the camera’s Aperture
Aperture describes the amount of light passing through the lens into the camera. All lenses are marked with a maximum aperture, weather it’s on a point and shoot or an SLR. The aperture is also known as the f-stop. In the image below, within the blue box shows an aperture of “F2.8”. The lower the f-stop, the more light that is entering the camera. The more light entering the camera, the quicker the shutter speed can be to give you correct exposure.
The aperture also controls your depth of focus in an image. If you are looking to have your subject in focus, but the background blurry, you need a low aperture lens and a low aperture set on the camera. When a photographer talks about stepping a lens down, he is describing shooting at a higher f-stop. The higher the f-stop, the less light entering the lens, and the greater your depth of focus becomes. This is what you would do if you were shooting a landscape image where everything from the grass to the mountains to the clouds was in focus.
ISO
ISO is the sensitivity of the sensor of the camera. The higher the ISO, the more sensitive the camera is to light, and the quicker the shutter speed can be to give you a correctly exposed image. In the image below, in the yellow box, the ISO is set to 800. For those wondering, ISO stands for International Organization for Standardization. When you shoot at higher ISO settings, you are likely to see more noise in your images. Noise is a speckling of randomized color in your image. The lower your ISO, the less noise you get. However, the lower your ISO, the slower your shutter speed needs to be to get a correctly exposed image.
Bring It All Together
So your image is blurry. This occurs when your shutter speed isn’t quick enough. In order to raise your shutter speed, you need to either raise your ISO or set your aperture to a lower f-stop. Making your sensor more sensitive or allowing more light into the camera will allow you to shoot at a high enough shutter speed to take a clear image.
Keep in mind that 1/60th of a second is the magic number in most situations, however if you are shooting sports, dancing, or any other high motion activity, you may need a shutter speed upwards of 1/1000th of a second.
Still Unable to Get a Clear Image?
In some situations, your camera will be unable to obtain a shutter speed quick enough to get a correctly exposed image. I have run into this issue at concerts where lighting is incredibly low. I prefer a clear image which is underexposed over a blurry image which is correctly exposed, then restoring correct exposure using photo editing software. Shooting Manual, I will set my shutter speed to 1/60th of a second through 1/250th of a second. Next I’m setting the aperture to as low an f-stop as possible, thus letting in as much light as possible. And finally I’m setting my ISO as high as I can, without having too much noise. Find this setting before the concert by taking photos in a low lit area and raising your ISO between shots. RAW image format is extremely useful in this situation. RAW is an uncompressed image format which retains more information about the image for editing. In a RAW processor such as Adobe Lightroom, you can raise an image’s exposure back to correct level. This is a difficult process, but if you’re stuck in a bad lighting situation, you need to be able to adapt.
Still have questions? Still feeling lost?
We are here to help you enjoy photography. Stop by Bergen County Camera in Westwood. We offer classes, private tutorials, and trips to help you enjoy your camera.