Free Class with Holiday Camera Purchases

All customers purchasing a qualified camera will receive a code to register free for this event.
Bergen County Camera news, events, products, helpful photographic tips and suggestions
All customers purchasing a qualified camera will receive a code to register free for this event.

Here are Tamron’s latest instant savings, valid from now until December 30th 2017.
Read more to see all of Tamron’s current instant savings.


The Omnicharge 20 is a new portable charger, offering many features that makes it stand out compared to your average smartphone charger. But how well does it do the job? To answer this question, Harold took the Omnicharge home with him and tried it out for himself. Here’s what he thought:
“Having tried many battery and portable inverter options over the years, I decided to give the Omnicharge a try. In terms of options to charge a variety of items, the Omnicharge does not disappoint…
When I first saw the Omnicharge 20, I thought I was simply looking at a larger version of a standard smartphone or tablet battery pack / charger. But looks can be deceiving, and the more I checked it out, the more features I discovered.
First, the capacity is significant… 20,400 mAh. Without delving into the numbers, that’s more than 5x the capacity of a standard portable charger, and is listed as being enough battery capacity to pretty much charge a laptop once, up to 9 full smartphone charges, or up to 8 full tablet charges.
Output ports include a 3-prong AC/HVDC (high-voltage DC) 3-prong socket, 2 x USB ports, a co-ax (i.e. “barrel”) DC port, and even a Qi wireless charging pad for compatible smartphones. A status screen (OLED) shows basically everything you need to know about it… battery capacity, charge time remaining, battery temperature, which ports are active, DC port setting, AC port setting, wireless device charging, etc. A menu can also be displayed to allow configuring the Omnicharge; that can be controlled with the power button, the USB power button, and the AC power button. As I went through the options I could see that every aspect of the device (except the USB ports) has multiple functions. I found the Quick Start Guide to be rather sparse, but found useful information on the manufacturer’s website: http://omnicharge.co.
To charge the Omnicharge 20, you can use the included AC adapter, or you can use the supplied USB-to-DC cable to charge it using USB-compatible AC/DC adapters you may already have for your smartphone / tablet / camera, or you can even charge it with a solar charger; the Omnicharge can accept DC from 4.5volts to 36volts. This means it can be charged at home, in a car, or even outside where no pluggable power source is available.
Unlike other portable electronics, the charging port can even be used to charge the Omnicharge or it can be used to charge devices from the Omnicharge. There is a menu option to tell the charger how to use the DC port, and even what output voltage to use. NOTE: Before setting up the DC output port, it’s important to know the voltage rating for whatever devices will be plugged in. This info is usually either on the device or on the power adapters that come with the devices. If not sure, best to contact the device manufacturers.
After making sure the Omnicharge 20 was fully charged (approximately 2-3 hours to charge from zero), I started “plugging” away…
I opted to test the Omnicharge 20 Pro kit, as it comes with a set of cables / connectors to charge a variety of laptops from Dell, HP, Lenovo, Microsoft and Apple through the DC output port. After turning on the unit, I set the DC port to provide 20volts output, plugged the supplied MagSafe2 (Apple) adapter into the Omnicharge and the laptop, and watched it go. IMPORTANT: Before configuring DC output power, make sure you identify the voltage needed for your device… either from your device’s AC adapter (look for DC output voltage), or from the manufacturer; if unsure, always check with the manufacturer. The MagSafe2 plug displayed its orange light to show it was charging the laptop. While using the computer, the battery percentage indicator showed the charging progress. After about 40 minutes, the laptop battery went from about 25% charged to 98%. Nice.
I turned the unit off and made sure the DC port was ready for input. After re-charging the Omnicharge, I decided to give it more of a challenge. I took an older Apple computer (one without the MagSafe2), and went to charge it using its AC adapter. While the Omnicharge uses a sine-wave inverter (tech talk for saying you can plug an AC-powered item into a DC power source) to provide the 120volts AC to charge your device, it can also be configured to output 150volts DC via the same port… not something that would ever occur to many of us. ****IMPORTANT**** This should only be set if you know for sure that your AC adapter uses a switching power supply that can take the higher input voltage!! For camera chargers and other basic electronics, or if simply not sure, stay with the standard 120volt AC setting!! Using the wrong setting can damage your devices. For the older Apple laptop, both options worked, so I used the higher voltage DC setting. The display indicates whether it is set for AC or HVDC (high-voltage DC), so you can see at a glance if you have it set right.
The Omnicharge can charge multiple devices at the same time, and it keeps tabs on the charger / battery temperature. If it gets too stressed or too hot, it shuts down. The output and temperature are constantly shown on the display, and it enables a fan to help dissipate any heat. While I was charging the older laptop, I plugged in my smartphone to charge it at the same time. The Omnicharge balanced the output accordingly. The specs say it can be plugged in / charged while charging other devices… so I plugged it in, and it continued to perform. The temperature gauge showed it getting up to about 113 degrees, but it never got too warm to touch.
Independent of the other testing, I have also repeatedly plugged camera chargers into the AC port (configured for 120volt AC), and found it so much more convenient to have the Omnicharge nearby than to find an available wall socket to accommodate the camera charger.
The Omnicharge 20 packs a lot of features into a small package, and yet is a much simpler / flexible portable power solution than I have used before.”

Oren Helbok has been fascinated with trains since he was a kid growing up in the Bronx, when he’d head down to the local tracks with his dad, a skilled amateur photographer, and have picnic suppers. “My first photo was of a steam train, taken when I was 6 years old,” he says. “I was completely swept away by the engines.”
Today, Oren’s fascination continues, and he now regularly heads out between 60 to 70 days a year to photograph the steam trains near his home in Bloomsburg, Pennsylvania. “The Strasburg Rail Road, which is the oldest continuously running short-line railroad in the country, is only about two hours south of me, and there are a number of other railroads that also operate steam,” he says.
When he was a boy, the trains were all about the hardware. “Now that I’m older, I’ve realized the thing that’s most important about the trains is the people who are doing the work,” he says. “So while I still enjoy capturing pictures of the trains themselves, I also want there to be some connection to either the landscape, the places they’re traveling through, or the people working on the trains.”
Oren recently spent a full day at the Strasburg site with the Tamron SP 15-30mm F/2.8 VC wide-angle lens. “This lens was recommended to me by a fellow photographer who said if I was looking for a stellar wide-angle lens, this was the one to try,” he says. “And it’s the best there is. What I was looking for was a super-wide-angle lens that I could use in a locomotive cab. I wanted to capture these guys at work, and I needed something that could get as much of that small space from inside as possible. The F/2.8 maximum aperture helps me out when the lighting isn’t great, and the Vibration Compensation (VC) feature is indispensable to counteract the movement on the train. Steam locomotives don’t ride like Cadillacs—they tend to bounce around, so the VC is infinitely helpful.”
Although he’s not trying to fool anyone into thinking his images are from another era, he does try to lend them a historical feel by eliminating modern distractions. “If I’m out in the middle of the landscape, for example, I’ll go out of my way to avoid a billboard or taking a shot right from the side of the highway, unless there’s some kind of story I can tell about how that train comes through that particular landscape,” he says.
As for how he photographs the people in his train photos, Oren tries to stay unobtrusive and captures many of his images from the back or the side, where his subjects’ faces aren’t in full view. “That’s not to dehumanize the work that’s being done, but to depersonalize it,” he says. “What I mean is, a photo isn’t necessarily about one particular person—that person stands for all of the people throughout the history of steam railroading who’ve done this job. I try to make my photos somewhat timeless that way.”
He did that with one crew member standing with his back to Oren. “That guy had been at work just 30 minutes, but it was August and one of the hottest, muggiest days I’d ever experienced down by the trains,” he says. “It was brutal. He’d already sweated right through his shirt. I wanted to show that aspect of the job without the distraction of his face or expression. I let the sweat speak for itself.”

Oren enjoys showing the workers in their element, including when they’re hosing down and detailing the cars (a.k.a. the “spit-and-polish” job) and shoveling the coal. “The tight spaces I show here is exactly why I needed this 15-30 lens,” he says. “I wanted to capture as much of what’s going on as possible in a very small piece of real estate. I needed the big, wide view that the 15-30 offers.”


Every month, a locomotive undergoes what’s called a boiler wash, which is when the crew cleans out any accumulated gunk. “When you put water into a boiler and heat it up, if there’s any crud in that water, it can separate out and end up coating the surfaces,” Oren explains. “That gunk blocks various orifices you don’t want blocked and makes everything less efficient, so once a month they have to open up all of those plugs and wash the boiler out.”
The man seen here had just finished up that job. “I shot this in the engine house, so there was a significant amount of light coming from behind him from the building’s large windows on the left-hand side,” Oren says. “There were also some fluorescent fixtures running across the ceiling, but by this time of day, with the other track empty and no engine sitting there, the light was able to come in unimpeded. That helped give me just the right illumination I needed for this image.”

Sometimes Oren is even lucky enough to get some steam in the shot. “The photo of one of the crew working on top of the train was taken in perfect conditions for that kind of thing,” he explains. “With steam in particular, cold weather is best, as well as humidity. It was a seriously hot day, so I didn’t have that cold, but the air was so humid it couldn’t absorb anything else. That meant the steam, instead of vanishing, simply hung in the air.”

Of course, he also had to grab a shot of the person at the top of the train crew hierarchy. “The engineer is the one who’s in charge,” he says. “He’s got his hand on the throttle and is the one who gets to drive the engine.” This was another chance for Oren to hold his camera outside the car as the engineer peered out of his own window, offering a more intimate environmental portrait. “At this railroad, they’re trying to provide a very particular experience for their customers, without modern items getting in the way,” Oren notes. “That’s why this engineer looks like he could’ve stepped out of another time period. All of the guys who work here dress the part and look authentic. Maybe once in a while you’ll see a crew member with keys attached to a caribiner, but that’s about as anachronistic as it’ll get.”

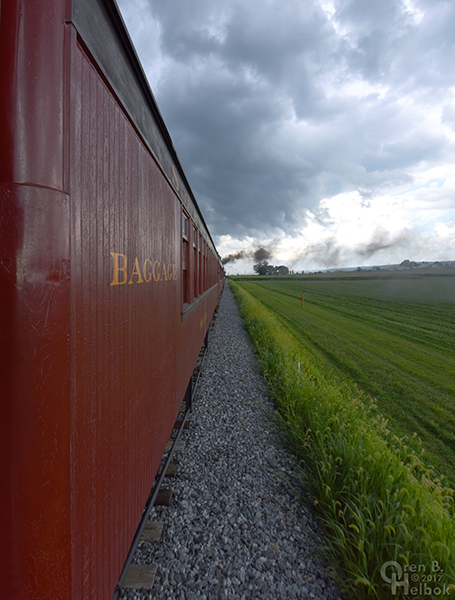
Another experiment Oren’s been dabbling in: capturing pictures of the landscape while he’s riding in the train. “I won’t look through the viewfinder in those cases, but rather hang the camera out over the gate and either use Live View or just shoot away and hope for the best, based on what I’d already seen with my own eyes,” he says. “In this one in particular, you not only have the lines of the railroad car itself, but the lines in that field next to the train car. In Lancaster County, there are a lot of Amish farms, and they regularly plow their fields and create those lines. The VC on the 15-30 was critical here to keep everything sharp.”
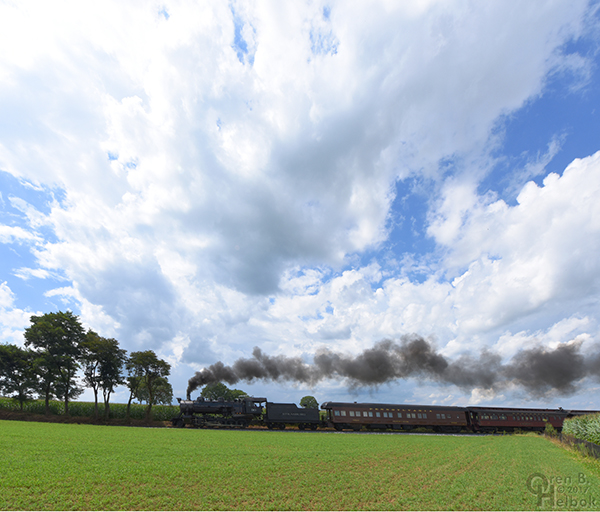
Capturing the whole train itself against the context of the landscape is another way Oren put the 15-30 to the test. “I had set myself the challenge of going out the entire day with that one lens, and using it not only in tight spaces, but also in wide-open areas,” he says. “I wanted to make the most of it in completely different situations. So yes, I show a train here, but it’s a train against that landscape, with that huge sky filled with cumulus clouds. That gives a whole new angle to the story I’m trying to tell.”
To see more of Oren Helbok’s work, go to his website https://www.wheresteamlives.net/ or Facebook www.facebook.com/oren.helbok/photos.
Here are the latest Panasonic deals, valid from November 12th to November 27th 2017.
For questions and availability, please call us at 201-664-4113 or visit us in store!
 Read more to view all of the Panasonic deals this month.

It’s no secret that for most of us, the holiday season is the one and only time we mail out personalized greeting to friends and family members each year. And since we only do this once – we say ‘do it right’ and take the time to create the nicest, most meaningful greeting that you can send.
Use these tips and suggestions for a killer holiday card:
Our creative team follows your order from the moment it arrives at our location. We don’t outsource this process and take care in producing the finest results. Each and every order is quality checked before it reaches your hands.
Choose from a wide variety of exceptionally designed greeting cards with themes that are easily customized with your favorite photo(s) and sentiments. Need some design expertise? We’re happy to co-create with you!
We’re offering 25% off all greeting card orders until November 26th, so don’t delay!
You can start your design here.

Lightroom 1 – November 8th – $50 – Learn the basics of Lightroom and get started creating a workflow. This course will cover organizing and importing in the Library module as well as keywords and collections.
Basic Digital Photography – November 14th – $50 – Join BCC’s John Tworsky and Paul Carretta for a 2 hour introduction to Digital Photography. This class is designed to provide the basics of digital photography regardless of the type of digital camera you are shooting or even if you are looking to buy your first. Topics to be covered include basic camera operation, batteries, storage media, card readers, choosing a resolution, compression, limitations and advantages of digital photography, making prints & enlargements, and storing & archiving images. Of course there will be plenty of time for questions at the end of the presentation.
Intermediate Digital Photography – November 15th – $50 – Join BCC’s John Tworsky and Paul Carretta for a 2 hour continuation of Basic Digital Photography. This class is designed to provide the next step in your digital photography learning. Topics to be covered include exposure (f-stops, shutter speeds, ISO), using shutter speeds to control motion, using f-stops to control depth of field, and ISO to control sensor sensitivity. We’ll talk about composition, tripods, monopods, self timers, keeping your images safe and more. Suggested Pre-requisite: Basic Digital Photography. Of course there will be plenty of time for questions at the end of the presentation. Course handouts include test your knowledge assignments, basic class reminders, special offers, computer tips and helpful programs.
Basic Photoshop – November 28th – $50 – Join BCC’s John Tworsky for a two-hour class introducing Adobe Photoshop. This course is for first time and beginner Photoshop & Element users and will cover computer & program requirements, acquiring images, image formats, storage considerations and a basic overview of the capabilities of Photoshop. Examples include opening images, rotating, preparing images for email, preparing images for printing, image adjustments (brightness, contrast & color), fixing crooked images & scans and printing multiple images on a single sheet of paper. Although this class is presented on a PC, all information will carry over to the Mac.
October 26, 2017, Commack, New York— Tamron USA, Inc. , announces the launch of a new ultra-telephoto zoom lens, 100-400mm F/4.5-6.3 Di VC USD (Model A035), for full-frame Canon and Nikon DSLR cameras. The Model A035 delivers fast and precise AF performance and consistently powerful VC (Vibration Compensation) 4 stops*1 benefits thanks to the high-speed Dual MPU (Micro-Processing Unit) control system that is found in the latest Tamron lens models. The advanced optical design of Model A035 includes three LD (Low Dispersion) lens elements for aberration reduction and Tamron’s original eBAND Coating for superior anti-reflection performance. At 1.115g (39.3 oz), the new lens is the lightest in its class*2 and features magnesium alloy in key areas of the lens barrel to ensure weight reduction, and improve strength and portability. Model A035 is compatible with Tamron’s 1.4X tele converter and the Tamron TAP-in ConsoleTM that enables lens customizations for focus adjustments, VC mechanism adjustments and more. Additionally, an Arca Swiss compatible tripod mount is available as an optional accessory. The new Tamron 100-400mm will be available in both Canon and Nikon mounts on November 16th at $799.

Product Highlights
1. High-speed Dual MPU (Micro-Processing Unit) control system delivers quick and highly
responsive autofocus performance plus outstanding VC image stabilization
The Dual MPU system includes an MPU dedicated to vibration compensation processing, enhancing the computational capacity of the entire system. An MPU with built-in DSP (Digital Signal Processor) provides high-speed digital signal processing and achieves outstanding autofocus performance and vibration compensation, both indispensable for ultra-telephoto photography.
2. Superb image quality in an ultra-telephoto zoom lens
The Model A035 includes three LD (Low Dispersion) lens elements for optimal optical design and aberration correction. Lighter weight, increased light transmission and crisp images with excellent contrast are achieved by reducing the number of lens elements while ensuring an appropriate balance with aberration correction. The A035 has minimum object distance (MOD) of 1.5 m (59 in) and a maximum magnification ratio of 1:3.6 for close-up work.
3. Exclusive eBAND Coating reduces flare and ghosting
The new A035 features Tamron’s eBAND (Extended Bandwidth & Angular-Dependency) Coating, which has an extremely low refractive index and fine multiple-layer coating technology, to achieve outstanding antireflection performance. BBAR (Broad-Band Anti-Reflection) Coating, with excellent antireflection characteristics, increases light transmission. These coating technologies greatly reduce the ghosting and flare that can occur when subjects are backlit.
4. Lightest weight, 1,115 g (39.3 oz) lens in the ultra-telephoto zoom lens class*, and only 196.5 mm (7.7 in) long
Magnesium alloy is used in key areas of the lens barrel to improve weight reduction, strength and portability. Total length of 196.5 mm (Nikon mount) means a compact size for an ultra-telephoto zoom lens covering up to 400 mm, and the A035 can therefore be easily carried in a standard camera bag. Combined with excellent vibration compensation functions, the compact size enables successful handheld ultra-telephoto photography.
5. Optional accessory tripod mount is Arca-Swiss compatible
An Arca-Swiss style tripod mount is available as an optional accessory. Designed exclusively for Model A035, it provides quick and secure attachment to a tripod and greater stability. An easy-to-hold grip shape includes an expanded mounting plane, and the use of magnesium helps achieve lighter weight, thereby further facilitating handheld photography.
6. Compatible with tele-converters and TAP-in Console
Model A035 is compatible with tele converters designed exclusively for Tamron lenses to achieve 1.4X and 2X the original focal length*. It’s also compatible with Tamron’s TAP-in Console (Model TAP-01), an optional accessory enabling users to update lens firmware and customize the lens settings, including adjustments of focusing positions for autofocusing and the operation modes for the lens’s Vibration Compensation system.
*Use of the 1.4× tele converter results in light reduction of 1 F stop; use of the 2× tele converter results in the loss of 2 F stops
Available focusing mode when used with 100-400mm F/4.5-6.3 Di VC USD (Model A035)
| When using viewfinder | When using live view mode | |
| With 1.4x tele converter | AF3*4/MF | AF4/MF |
| With 2.0x tele converter | MF | AF4/MF |
3 Autofocus functions normally on any camera that offers F/8 autofocusing (see your camera’s instruction manual for your camera’s ability).
4 Subjects with low contrast and/or luminosity values can sometimes result in out-of-focus images.
7. Moisture-Resistant construction and fluorine coating for enhanced weather protection
The surface of the front element is coated with a protective fluorine compound that has excellent water- and oil-repellant qualities. The front surface is easier to wipe clean and is less vulnerable to the damaging effects of dirt, dust, moisture or oily fingerprints, allowing for much easier maintenance. Also, with active use of the A035 for outdoor photography likely, sealant is used in each of the movable and joining areas of the lens barrel to resist the intrusion of moisture.
8. Electromagnetic diaphragm system now used also for Nikon-mount lenses
An electromagnetic diaphragm system, which has been a standard feature for Canon-mount lenses, is now employed in Nikon-mount lenses*. More precise diaphragm and aperture control is possible because the diaphragm blades are driven and controlled by a built-in motor through electronic pulse signals.
* Available only with cameras compatible with the electromagnetic diaphragm (D5, D4s, D4, D3X, Df, D850,D810, D810A, D800, D800E, D750, D600, D610, D300S, D500, D7500, D7200, D7100, D7000, D5600, D5500, D5300, D5200, D5100, D5000, D3400, D3300, D3200, D3100). (As of October, 2017; Tamron)
9. External design places importance on functionality and ease of use
While inheriting the design that makes use of many organic curves and the delicately polished form down to fine details that characterize the SP lens series, the new Model A035 comes with a highly sophisticated design that also places a lot of importance on the lens’s functionality and ease of use, featuring an overall form that faithfully encompasses the internal structures within, a slim Luminous Gold brand ring and the switch shape design.
