Photographing National Parks After Dark with Ken Hubbard

Ken Hubbard, an avid Tamron shooter, shares some of his tips for photographing the night sky in our National Parks.

Pack wide-angle lenses.
This is a no-brainer, since you want to get as much of that jaw-dropping night sky as possible in your photos. The lenses I typically use: the Tamron SP 24-70mm VC G2, the SP 15-30mm VC, and the SP 35mm F/1.8 VC. That prime lens is especially useful because of its fast F/1.8 aperture—it’s desirable to use fast apertures for night sky photos, as you want to reduce the amount of time your shutter is open to reduce star movement. With a 1.8 lens, I can shoot a 10-second exposure instead of 20 or 30 seconds.

There’s a magic number for any focal length you may be using and how long your shutter can stay open before you start getting those streaks in the stars. Although there are some complicated equations, let’s keep it simple. A basic guideline to get you started is the 500 rule: Divide the focal length you’re shooting at into 500; that resulting number will give you the number of seconds your shutter can stay open before you start seeing star movement. So if I’m shooting at 15mm, I can keep my shutter open for roughly 33 seconds. If you see movement in your stars, shorten your exposure.

Determine the optimal time to head out.
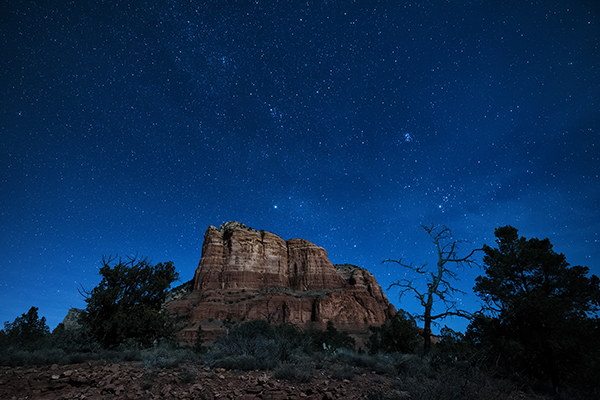
Our group tries to venture out during the blue hour, an hour or two after sunset, when there’s still some ambient light to create that beautiful indigo color. You can see an example of that in one of my Sedona photos shown here, where the featured rock formation was also lit up by the quarter-moon that had already risen.

© Ken Hubbard

If you’re going to try for a money shot like the Milky Way, you’ll want to check apps like Sky Guide or PhotoPills to see where and when it will be rising. You don’t want to head out somewhere with a group of people and discover there’s no Milky Way overhead. Capturing it when the skies are darkest—typically between midnight and 2 a.m., depending on the time of year— is ideal. Between April and September provide your best looks: During other parts of the year, the Milky Way either never makes it above the horizon, or it’s too close to sunrise or sunset and will be completely washed out. You’ll barely see it, if at all.

© Ken Hubbard

Research the park you’re going to.
I often start this process months ahead of time, so I’ll know the best times of year to visit, depending on what I’m planning on taking pictures of. Our group will also head out at least a day before a workshop, so we can scout the landscape to make sure it’s everything we were anticipating. You also want to get the lay of the land during the day so when it’s dark you’re not stumbling around with no sense of place.

It also helps to know which parks are rife with light pollution and which aren’t. You can check the International Dark-Sky Association website to see which communities have pledged to preserve the night sky by keeping lighting to a minimum. As far as the national park areas I’ve visited, Sedona is a designated dark-sky community; Zion isn’t too bad, either, and Acadia in Maine is pretty dark, as there aren’t too many towns around throwing off a lot of light. If you do have a park that’s lit up from afar, you can use that light to your advantage (or at least mask it) by using some creative techniques. More on that a little later!

Bring the basics …
A couple of things you’ll definitely need: a tripod, as you’re going to be taking very long exposures (20 or 30 seconds long in some cases). And you’ll want to bring a shutter release cable or some sort of shutter remote. You don’t want to be hand-firing the camera and risk losing images that way.

… and also a flashlight.
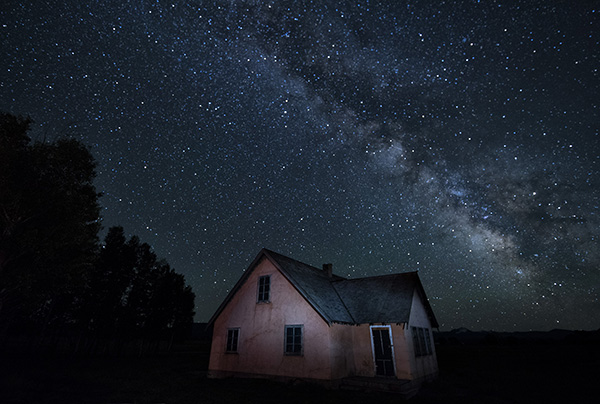
One, to see where you’re going, and second for light painting. That’s a terrific way to accentuate your images, like I did in my photo of Mormon Row in Grand Teton National Park. One tip I have for this type of creative endeavor: Don’t simply throw the light from behind your camera—your subject will tend to look flat. Because I’m usually taking 20- or 30-second-long exposures in these cases, what I’ll do is hit the shutter release, then walk to one side or the other of my camera and throw the light in from an angle, so it adds a little more dimension with shadows and highlights.

© Ken Hubbard

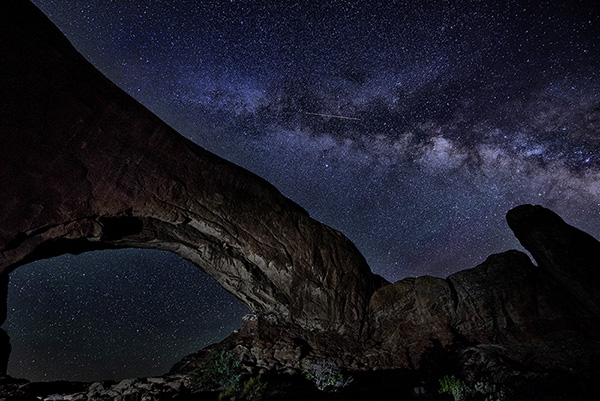
Sometimes other photographers’ light-painting adventures can work their way into your own photos. This image I took of one of the arches in Arches National Park was a happy accident. I was about 20 seconds into a 25-second exposure when someone who was sitting underneath the arch decided to blast it with light. I didn’t know it was going to happen, but it turned out to be a cool picture anyway.

© Ken Hubbard 

Before you start flashing lights everywhere, know the rules of the park you’re visiting.
Workshop leaders need permits no matter what to host groups in most national parks. The group that ran this year’s night sky workshops for us was National Park Trips Media, which took care of all of the logistics.

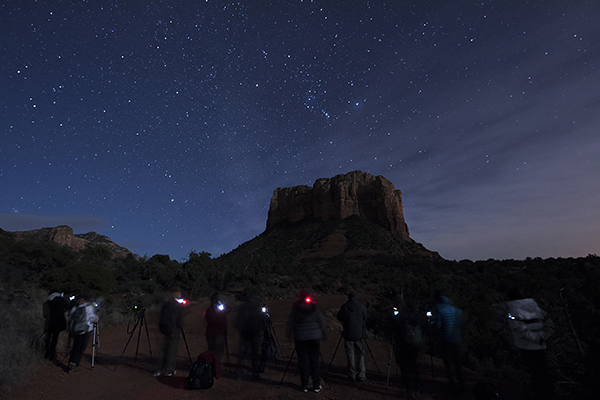
Some parks outright prohibit the light painting I mentioned earlier, especially from large groups. I can understand that: It can be annoying to individual photographers or nature-gazers in a park, trying to check out the night sky, only to have a bunch of people show up all at once and start blasting light everywhere. Individually, you often can light paint without a hassle, though check with your destination park before you go, as each has its own rules.

Seek out elements in your landscape to enhance your composition. 
Here’s where landscape photography during the day and at night doesn’t differ too much, because you always want some kind of landscape elements to create compelling visuals. That could entail some sort of silhouetted area or foreground visual—either a manmade one, like a building, or a natural one, like a rock formation. 

More often than not, I’ll try to keep those foreground elements in the lower third of the frame, as I’m using them mainly to enhance the night sky I’m trying to show off. And since I’m typically using a wide-angle lens in my night photography, I get up real close to whatever I’ve decided my subjects will be, as those elements will appear very small in a wide-angle photo otherwise. 

Tap into the leading lines of the landscape. 
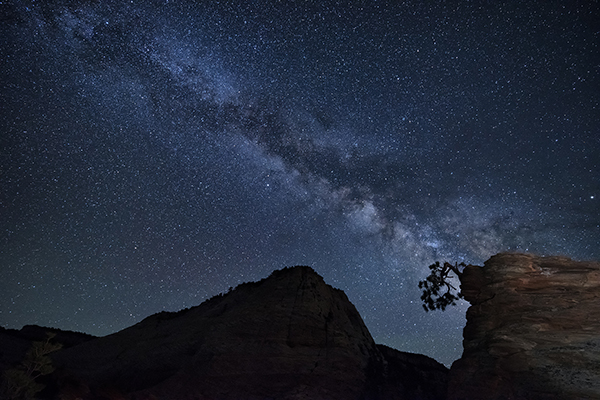
I use natural lines to draw the viewer’s eye to where I want it to go. For instance, in my Milky Way photo taken in Zion, I positioned myself so the Milky Way descends straight down into the rock formation with the tree sticking out of it. 

© Ken Hubbard

I’ll also use the shape and structure of the landscape to either enhance the photo or mask issues that might be threatening to distract from what I’m trying to show. For instance, in my other photo here from Zion, I used the lights of the town of Springdale in the distance to silhouette the trees in that gap. And in my image of Balanced Rock taken in Arches National Park, the horizon was really lit up from Moab. To work around that, I stood in a spot so that when I took the photo, the Milky Way streamed down toward the horizon—making it appear as if the Milky Way was lighting up the horizon, not the neighboring city.

You can find more of Ken’s work here.

Fall Foliage: Tips and State Foliage Websites

Foliage Photography:
Tips for great pictures

Foliage Maps:

–>> The Foliage Network Maps – website with frequent updates and color maps of the northeastern United States.

Filters

A polarizing filter is really the only “must have” filter to bring along for great digital fall foliage pictures. A polarizer creates dramatic fall foliage pictures by darkening the sky, increasing contrast and deepening colors and removing the sheen from the leaves. Most other filter effects such as enhancing reds and oranges, sepia and graduated effects can be easily created in Photoshop. Your standard protective UV filter should be removed before putting your polarizer on – never stack filters. Also, don’t forget to remove your polarizer when you move back inside, as it reduces light by one to two f-stops. Shop Polarizers in our online store.


Click to see image with and without a polarizer.

A second type of filter is an enhancing filter which does just what the name implies – enhances. This filter is especially effective with the bright primary colors of autumn (reds, oranges and browns). A third filter is a Color / Neutral Graduated filter which utilizes a color (or gray) that gradually diminishes from dark to light across the filter. These filters are often used to deepen the sky or to balance the exposure between foreground and background, which helps you keep the sky blue rather than washed out.

Tips

  • Nothing takes away from foliage more than a bright white overcast sky. In these situations, try to reduce the amount of sky in your images or use a Neutral Graduated filter.
  • Dramatic storm clouds of autumn thunderstorms interspersed with blue sky make a stunning backdrop for the brilliant colors of fall, especially when the vivid colors are brought out with a polarizer filter.
  • Use a tripod for the sharpest possible image. This will allow an ISO of 100 or 200. Remember to use a remote release or self timer to prevent motion when pressing the shutter.
  • Colors are warmer and can be more dramatic closer to sunrise and sunset. The hour before and after sunrise and sunset are considered by many to be the “magic hours” where you get an amazing quality of light.
  • Experiment, take lots of pictures and above all have fun!
  • Since you are shooting more with your digital camera, be sure to edit out some images before showing off your work to family and friends
Once you’ve assembled your camera and a few filters, all you’ll need is foliage at the peak of color. We’ve assembled a list of state hotlines below to help schedule your trip. Need some ideas for places to shoot, be sure to visit Bergen County Camera’s Where to take great Pictures page. Have some suggestions of your own? Please send us an email or comment on this post.

Fall foliage websites and hotlines

The Foliage Network – website with frequent updates and color maps of the northeastern United States.

State by State foliage websites – click on your state of interest below.

New Jersey 
mid to late October 
Connecticut
 Late September - mid October 
Maine 
Early September - mid October
Massachusetts
October 
New Hampshire 
Late September - mid October
New York
Late September - late October
Pennsylvania 
Early October
Vermont 
Early September - Late October
Virginia 
September - Late November
Delaware 
Late October
Maryland 
Late September - Late October
Rhode Island 
Late September - mid October 

Remember to visit Bergen County Camera for filters, tripods, lenses, cameras and prints.

Free Saturday Focus Sessions February – March

Focus sessions are Free and take place in our store from 9:30 am – 10:15 am. Focus Sessions are mini classes and discussions and classes about photography. All sessions will allow for questions and answers. Please bring your camera and any images along that you have questions about. Please share your thoughts for future focus sessions in the comment box below. No RSVP – Free for everyone – Please bring a friend!

focusbanner1Hit the “Like Button” to let your friends know. Have suggestions for future focus sessions? Feel free to leave a comment.


Here’s our upcoming Focus Sessions:


February 20 – f2.8 vs f5.6 – Learning to control focus and gaining higher shutter speeds

February 27 – Print formats, from square to panoramic – how to showcase your images

March 5 – Parade Photos + Billy on bagpipes

March 12 – Photo Exchange – Trade your photos – Bring one take One – 8×10 only

March 19 – Food Photography

March 26 – Easter Flowers / Easter Egg Hunt for the Grown-Ups (discounts a freebies hidden around the store) Limit 1 egg per customer

These are free events – bring a friend along if you’d like. Share with your friends on Facebook – Click the Like button below. Hope you can join us!

"fo</p

Free Saturday Focus Sessions for January

Focus sessions are free and take place in our store from 9:30 am – 10:15 am. All sessions will allow for questions and answers. Please bring your camera and any images along that you have questions about. Feel free to use the comment option to make suggestions for future focus sessions.

focusbanner1Hit the “Like Button” to let your friends know. Have suggestions for future focus sessions? Feel free to leave a comment.


Here’s our upcoming Focus Sessions:


January 2 – Shooting Geometric Patterns

January 9 – Using your flash (better)

January 16 – What is this button on my camera and why and when to use it

January 23 – f2.8 vs f5.6

January 30 – Shooting Basketball

These are free events – bring a friend along if you’d like. Share with your friends on Facebook – Click the Like button below. Hope you can join us!

"fo</p

Focus Sessions for November and December

Focus sessions are free and take place in our store from 9:30 am – 10:15 am. All sessions will allow for questions and answers. Please bring your camera and any images along that you have questions about. Feel free to use the comment option to make suggestions for future focus sessions.

focusbanner1Hit the “Like Button” to let your friends know. Have suggestions for future focus sessions? Feel free to leave a comment.


Here’s our upcoming Focus Sessions:

November 7 – Lakota Wolf Preserve Trip Review

November 14 – How to Shoot and Create and order a Great Holiday Photo Card

November 21 – Action Cameras – GoPro and V-360

November 28 – Great Holiday Gift Ideas

December 5 – Your Art Makes a Great Gift

December 12 – Winter Photography

December 19 – Christmas Light Photography

December 26 – Celebrate – Holiday Merry with Us

These are free events – bring a friend along if you’d like. Share with your friends on Facebook – Click the Like button below. Hope you can join us!

"fo</p

Upcoming Nikon Classes

nikon class bannerJuly 14th – Nikon Basic

The very basics of Auto mode, followed by how to get out of auto mode. This class focuses largely on scene modes and camera controls for exposure, white balance and focus. Composition and tips on improving photos are the main, non-technical areas that the class covers. This class is good for absolutely anyone with a camera, especially beginners and new DSLR owners. Join Bergen County Camera on Tuesday, July 14th from 7:00 – 9:00 pm. Tickets are $25 per person.

Eventbrite - Nikon Seminar - Basic

July 15th – Nikon Intermediate

This is an intermediate to advanced level DSLR class that covers many of the topics that one might explore after learning the basics of camera terminology and exposure. Topics covered include flash photography, custom settings, lenses, autofocus settings, metering and more. Join Bergen County Camera on Wednesday, July 15th from 7:00 – 9:00 pm. Tickets are $25 per person.

Eventbrite - Nikon Seminar - Intermediate

Free Focus Sessions – July and August 2015

Focus sessions are free and take place in our store from 9:30 am – 10 am. All sessions will allow for questions and answers. Please bring your camera and any images along that you have questions about. Feel free to use the comment option to make suggestions for future focus sessions.

focusbanner1Hit the “Like Button” to let your friends know. Have suggestions for future focus sessions? Feel free to leave a comment.


Here’s our upcoming Focus Sessions:

July 4 – No Focus Session – Bergen County Camera Closed

July 11 – Wildlife Photography

July 18 – Sensor Cleaning

July 25 –  When Things Go Wrong

August 1 – Infrared Photography – See what it can do for you – presenter Alan Schwab

August 8 – Mylio with Special Guest Harry Wendt

These are free events – bring a friend along if you’d like. Share with your friends on Facebook – Click the Like button below. Hope you can join us!

"fo</p

Long Exposure Photography

Long Exposures

1024px-Boulevard_du_Temple_by_Daguerre
“Boulevard du Temple”, a daguerreotype made by Louis Daguerre in 1838. The first known photograph of a human.

The first cameras ever made would only shoot long exposure photographs. These cameras could only capture low levels of light over a prolonged amount of time. The first known photograph of a person “Boulevard du Temple” was taken by coincidence in 1838. A gentleman just happened to get his shoes shined while the photograph was being taken. This anonymous figure stood just still enough for just long enough to appear in the final image.

Long exposure photography involved forcing your camera to shoot images at slower then needed shutter speeds in order to create a motion effect. Long exposure photographs can produce smooth or milky water, light trails, and moving object disappearing from the final image.

Depending on when you are taking your long exposure photograph, you will need the following items:

  • A Camera with manual setting
  • Tripod
  • Neutral Density Filter (during the day)
  • A remote release (Either wired or wireless)

There are a few ways to slow down your shutter speed without overexposing your photograph. You can lower your ISO, close down your aperture (f/8-f22), or use neutral density filters. Due to the shutter speed being slow, a tripod is needed to prevent motion blur on your subject.

1397311_577383000577_177590289_o
An example of a long exposure photograph taken during the day using a neutral density filter.

To take a long exposure photograph, place your camera into aperture priority or manual mode. In aperture priority your camera will choose a proper shutter speed based upon what you set the aperture and ISO to in your camera. If you set your ISO to 100 and raise the aperture to close down the lens (f/18 or f/22) your camera will be forced to take a photo at a slower shutter speed. The same effect can be created by manually setting the ISO, aperture, and shutter speed but you will be forced to meter your image instead of the camera.

When photographing water during the day, place your camera on a tripod and use a neutral density filter. Neutral density filters will allow less light to pass through your lens. There are several different levels of neutral density filters each blocking more amount then the previous. ( 4x, 8x, 16x, 32x, 400x, 1000x) Variable Neutral Density filters also are available. These allow the photographer to select how much light to let through.

10644103_610064311967_7570970746639168978_o
A night time long exposure shot without a neutral density filter.

When shooting Long Exposure photographs at night, the neutral density filter is often not needed. The camera can be placed upon a tripod and shot using whatever light is available. However, on nights when the moon is full or when you’re near other light sources the desired effect cannot be accomplished. In those situations a Neutral Density Filter can be used.

The effects accomplished by shooting long exposure photographs in the right places can be amazing. Recently a photographer named Christopher Thomas shot long exposure photographs of New York city which make the city look abandoned.  Michael Massaia, one of the artists represented by Gallery 270, has created several absolutely stunning photographs, including several photos in his “Afterlife portfolio, using long exposure techniques.

To learn more about long exposure photography stop into Bergen County Camera, comment below, or send us a message on Facebook. We’re here to help!

Visit Bergen County Camera this Thursday night, April 30th, between 6 PM and 9 PM to save 20% on all Promaster Camera batteries and filters. (including Neutral Density filters!)

Print Critique Focus Session Special

This Saturday, January 17th at 9:30 am, bring in one of your printed images for this week’s focus session and we’ll critique your print and provide you helpful tips in how to improve your photography. For participating in the focus session, you’ll save 20% on any frame for your print. Limited to one frame per person. Available on in stock items only.