Tips for fall foliage photos, and state foliage websites

Acadia National Park Fall Foliage

Acadia National Park – Maine
Got a great image to share? Enter it in our Thanksgiving Card photo contest.

Foliage Photography:
Tips for great pictures

Filters

A polarizing filter is really the only “must have” filter to bring along for great digital fall foliage pictures. A polarizer creates dramatic fall foliage pictures by darkening the sky, increasing contrast and deepening colors and removing the sheen from the leaves. Most other filter effects such as enhancing reds and oranges, sepia and graduated effects can be easily created in Photoshop. Your standard protective UV filter should be removed before putting your polarizer on – never stack filters. Also, don’t forget to remove your polarizer when you move back inside, as it reduces light by one to two f-stops.

A second type of filter is an enhancing filter which does just what the name implies – enhances. This filter is especially effective with the bright primary colors of autumn (reds, oranges and browns). A third filter is a Color / Neutral Graduated filter which utilizes a color (or gray) that gradually diminishes from dark to light across the filter. These filters are often used to deepen the sky or to balance the exposure between foreground and background, which helps you keep the sky blue rather than washed out.

Tips

  • Nothing takes away from foliage more than a bright white overcast sky. In these situations, try to reduce the amount of sky in your images.
  • Dramatic storm clouds of autumn thunderstorms interspersed with blue sky make a stunning backdrop for the brilliant colors of fall, especially when the vivid colors are brought out with a polarizer filter.
  • Use a tripod for the sharpest possible image. This will allow an ISO of 100 or 200. Remember to use a remote release or self timer to prevent motion when pressing the shutter.
  • Colors are warmer and can be more dramatic closer to sunrise and sunset. The hour before and after sunrise and sunset are considered by many to be the “magic hours” where you get an amazing quality of light.
  • Experiment, take lots of pictures and above all have fun!
  • Since you are shooting more with your digital camera, be sure to edit out some images before showing off your work to family and friends
Once you’ve assembled your camera and a few filters, all you’ll need is foliage at the peak of color. We’ve assembled a list of state hotlines below to help schedule your trip. Need some ideas for places to shoot, be sure to visit Bergen County Camera’s Where to take great Pictures page. Have some suggestions of your own? Please send us an email and we’ll include your suggestions.

Fall foliage websites and hotlines

The Foliage Network

New Jersey 
mid to late October 
Connecticut
 Late September - mid October 
Maine 
Early September - mid October
Massachusetts
October 
New Hampshire 
Late September - mid October
New York
Late September - late October
Pennsylvania 
Early October
Vermont 
Early September - Late October
Virginia 
September - Late November
Delaware 
Late October
Maryland 
Late September - Late October
Rhode Island 
Late September - mid October

Remember to visit Bergen County Camera in Englewood or Westwood, NJ for filters, tripods, lenses, cameras and prints.

Fireworks Photography Tips – July 2011

Where to photograph fireworks
Bergen Record guide to Independence Day Celebrations

Star Ledger guide to Independence Day Celebrations

Here are some basic starting points

If you have any questions, stop by the store, email or call. We’re here to help. Please let us know if you get some great shots we’d love to see!
Please feel free to leave your comments and suggestions. Have a great 4th of July Holiday weekend from all of us at BCC.

Find a fireworks display on NJ.com’s July 4th events page

Tripod
Electronic release (available for most cameras at BCC) or 2 second self timer to eliminate the motion caused by pressing the shutter button.
Manually set your camera ISO to 100 (You do not want Auto ISO)
Lens Choice – Wide Angle Zoom to frame what you’d like to capture
Auto White Balance or Daylight
Set your lens to manual focus then focus to infinity (take a test image and make sure things are sharp)
Set your camera to Manual exposure – Try 5 seconds at f/ 16
Carefully release the shutter if not using a release to capture from one to several bursts
Evaluate your exposure – Shorter exposures (or smaller apertures ) will darken the image and capture shorter trails, Longer exposures (or larger apertures ) will lighten the image and capture longer trails.
Evaluate sharpness by zooming in on your image – adjust as needed

If you are using a point a shoot, check your camera’s manual for fireworks mode.

Improving Fireworks photos
Shoot with a tripod – it will give a more natural cascade of light

Shooting the Finale!
The finale is many times brighter than rest of the show. Be ready to choose a shorter exposure or smaller aperture to prevent overexposure. The exposure you need is dependent on the number of simultaneous bursts. In some really incredible finales I’ve found myself shooting at 1/4 or 1/8th of a second. Experiment for best results.

Why use a tripod?

Hand-held image above shows motion from camera shake in the burst of light.

The image below is steadied by a tripod, 5 seconds, f16 at 100 ISO

Other Techniques
Set your camera to B and lock open your shutter – keep the lens covered with a dark hat and remove the hat to capture a burst then recover and repeat to capture several bursts. Just be careful not to bump your camera.
You can even zoom the lens during exposure for some interesting effects

Experiment and best of all have fun

Gallery images below shot mainly at 5 seconds, f16 at 100 ISO

Holiday Picture Taking Challenges

Thanks to everyone who contributed to our list of greatest holiday photo challenges. Please feel free to post a comment if you have any thoughts or additional questions!

Happy Holidays!

General Lighting Suggestions

  • Balance daylight, flash and Christmas lights
  • Indoor Photography – Proper Flash Technique

For those of us looking to get a nice balanced exposure when using flash here’s a few things to try. If you camera has a flash compensation (not exposure compensation), try dialing back the power to – 0.7 or -0.5 to moderate the impact the intense flash will have in your image. Turn up your ISO to 400 or 800, this will brighten the backgrounds up and make your pictures look more natural. Not sure how to proceed, check your manual or stop by for a quick tutorial. To balance daylight, flash and Christmas lights in the same image can be a challenge that in some cases goes beyond what your camera may be capable in a single image. For those who are interested, High Dynamic Range (HDR) photography takes the best highlights, shadows and overall exposure for different image elements from two or more images. If you are using an external flash, you can buy various diffusers that help smooth and even out the light put out by the flash. Look on our calendar of events soon for our list of January free “Focus Sessions” that may include Flash Photography and Flash Diffusion. Focus Session take place on various Saturdays at 9:30 am in Westwood and 10:30 am in Englewood and last about 30 minutes.

For indoor shots be sure to remove your polarizer filter – just leave your protective UV on your lens – never stack filters.

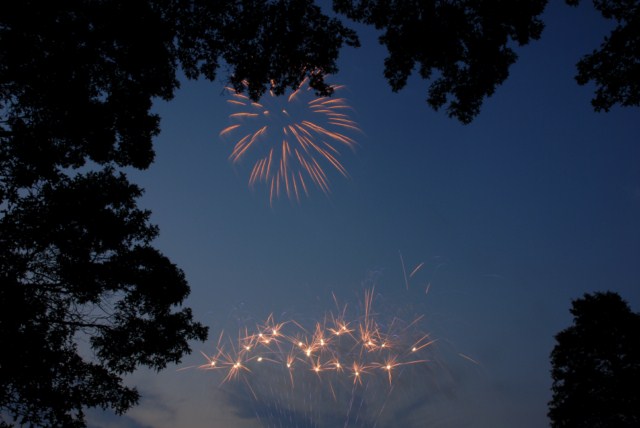
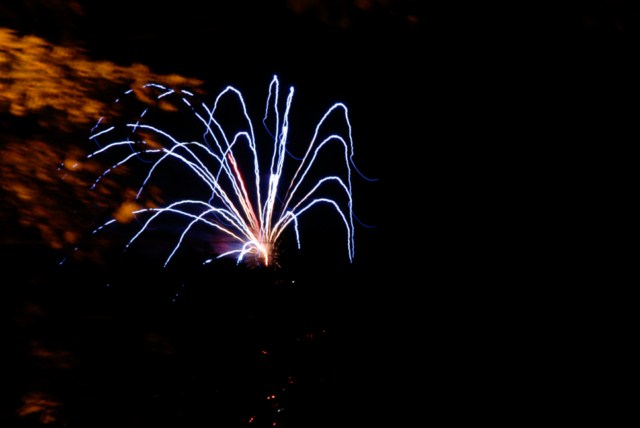
Nighttime Photography of Holiday Lights

Rockefeller Center Tree with point and shoot

Photo: Gerri Facchine

To get nighttime photographs of Christmas lights here are some recommended items – warm gloves, hand warmers, hat, an extra battery in a warm pocket, tripod & camera shutter release. The self timer can be used to trigger the shutter in a pinch without shaking the camera. Just set it to two seconds, gently trigger the shutter and make sure you are clear of the camera when the shutter trips (this minimizes any potential shake). It’s also a good idea to bracket your exposures. This means take a variety of exposures so that you will be able to choose the best one. You can easily make these adjustments using the exposure compensation ( the +/- button) on your camera. Take the normal exposure (if too dark – try +1, +2 or +3) (if too light try -1, -2 or -3 ).  With this approach you should be able to capture just the right exposure. If you are doing extended night photography on a really cold night, or you left your camera in a cold car for an extended period, the battery life will be shortened – that’s why you keep a backup in a warm pocket so that you can keep shooting.

Even a point and shoot camera can capture nighttime images (see Rockefeller Center above) just as long as the camera is steadied on a mini tripod or solid surface.

If you have a subject in the foreground, you can use your camera’s slow synch feature with the flash to illuminate the foreground and background. Don’t forget to put your flash back to the normal mode when you are done. Not sure how to set your camera – check your manual or stop by either Bergen County Camera location for a quick tutorial.

Getting Better People Shots

  • Making sure everyone looks good
  • Kids Opening Presents
  • How to photograph children so they look natural – lots of pictures my kid turning or running away from the camera
  • Catching good candid shots of people without food or drink in the way

One of the first suggestions you will hear our store manager Paul Carretta suggesting is be ready for the shot. This means your camera is on, your lens cap is off, and your camera is zoomed to the widest setting so you a ready to go at a seconds notice. How many times have you or have you seen someone pick up a camera to take a picture with a lens cap on or the camera turned off! If you have a red-eye reduction mode on your camera that produces a barrage of flash and lights, turn if off – especially with large groups. With red-eye flash modes, most people are uncertain which flash is the real flash and tend to be in many states of preparedness – this hurts your candid photography. A little preparation goes a long way to getting candid uncluttered images. When setting up, be aware of your background, watch for plants behind people heads, do some quick cleanup of anything that may clutter up your image.

Use your high speed setting to take a rapid sequence of images – just be sure to pick the best one. Choosing the best image can be a challenge, so if you are having a tough time, stop by the store we’ll be glad to help.

When it comes to opening presents, candid photography in this situation is usually the best mixed in with a few attempts to pose the shot. Often with kids the more you can blend in the smoother this whole process will go. Experiment with flash and existing light – no flash – high ISO which will help you blend in more to capture those candid moments. Always take a few test shots to make sure your settings work. Take lots of shots and review your results, get a critique and modify your technique as you learn what works and what doesn’t”

How to capture a performance – plays and ballet

How to photograph a holiday performance

An adjustable SLR camera with a fast lens, tripod or monopod, with a powerful add on flash is your best bet to capture performance photography. Always check the venue to be sure what type of photography and whether flash is allowed. A very important reminder is your built in flash on Point and Shoot and SLR cameras reach no further than 10 feet! If you attempt pictures further away, you capture a very dark image and the brightly illuminated seat back just in front of you. A hot shoe mounted flash can boost your flash range to over 50 feet.

With an add on flash or with built in flash closer than 12′

A monopod is great for taking the weight off and allowing your camera to be in a ready position. Shoot with your camera on program to start and make adjustments with your +/- (exposure compensation) depending on whether your pictures are looking too bright or too dark. If you are using your built in flash try raising your ISO – with a powerful shoe mounted flash try ISO 800 or higher.

Without flash

A monopod, fast (low f number lens) this is where a 50mm f1.4 lens can greatly enhance your existing light photography in combination with a higher ISO – ( 800, 1600 or 3200). Just be aware that the higher you raise your ISO the more noise (like film grain) your image will have. Raise the ISO only high enough to capture your subject. The example above was photographed with a 85mm lens at ISO 400 at 1/125th at f2.8.  If you lens is a f5.6 you would need to set your ISO to 1600 to achieve the same f-stop and shutter speed. Another tip is to shoot at the peak of action (i.e. someone is neither going up or going down for a brief instant) or to wait for a lull in the action.

Fall Foliage Photography – State Hotlines & Tips

Acadia National Park Fall Foliage

Acadia National Park – Maine

Foliage Photography Tips for great pictures

Filters

For digital there is really only one “must have” filter to bring along for great fall foliage pictures – a polarizer. A polarizer creates dramatic fall foliage pictures by darkening the sky, increasing contrast and deepening colors and removing the sheen from the leaves. Most other filter effects such as, enhancing reds and oranges, sepia and graduated effects can be easily created in Photoshop. Your standard protective UV filter should be removed before putting your polarizer on – never stack filters. Also, don’t forget to remove your polarizer when you move back inside as it reduces light by one to two f-stops.

A second type of filter is an enhancing filter which does just what the name implies – enhances – especially the bright primary colors of autumn (reds, oranges and browns).  A third filter is a Color / Neutral Graduated filter which utilizes a color (or gray) that gradually diminishes from dark to light across the filter. These filters are often used to deepen the sky or to balance the exposure between foreground and background, which helps you keep the sky blue rather than blown out.

Tips

  • Nothing takes away from foliage more than a bright white overcast sky. In these situations, try to reduce the amount of sky in your images.
  • Dramatic storm clouds of autumn thunderstorms interspersed with blue sky make a stunning backdrop for the brilliant colors of fall especially when the vivid colors are brought out with a polarizer.
  • Use a tripod for the sharpest possible image to allow an ISO of 100 or 200 and use a remote release or self timer to prevent motion when pressing the shutter.
  • Colors are warmer and can be more dramatic closer to sunrise and sunset. The 1 hour before and after both sunrise and sunset are considered by many to be the “magic hours” where you get an amazing quality of light.
  • Experiment, take lots of pictures and above all have fun!
  • Since your shooting more with your digital camera, be sure to edit down before showing off your work to family and friends
Once you’ve assembled your camera and a few filters, all you’ll need is foliage at the peak of color. We’ve assembled a list of state hotlines below to help schedule your trip. Need some ideas for places to shoot, be sure to visit Bergen County Camera’s Where to take great Pictures page. Have some suggestions of your own please send us an email and we’ll include your suggestions.

Fall Foliage Websites

The Foliage Network

Fall Foliage Hotlines – click on a state below

New Jersey 
mid to late October 
Connecticut
 Late Sep - mid October 
Maine 
Early Sep - mid October
Massachusetts
October 
New Hampshire 
Late Sep - mid October
New York
Late Sep - late Oct
Pennsylvania 
Early October
Vermont 
Early Sep-Late October
Virginia 
Sep - Late Nov
Delaware 
Late October
Maryland 
Late Sep Late October
Rhode Island 
Late Sep - mid October

Fireworks Photography tips and examples

Here are some basic starting points

If you have any questions, stop by the store, email or call. We’re here to help. Please let us know if you get some great shots we’d love to see!
Please feel free to leave your comments and suggestions. Have a great 4th of July Holiday weekend from all of us at BCC.

Find a fireworks display on NJ.com’s July 4th events page

Tripod
Electronic release (available for most cameras at BCC)
Manually set your camera ISO to 100 (You do not want Auto ISO)
Lens Choice – Wide Angle Zoom to frame what you’d like to capture
Auto White Balance or Daylight
Set your lens to manual focus then focus to infinity (take a test image and make sure things are sharp)
Set your camera to Manual exposure – Try 5 seconds at f/ 16
Carefully release the shutter if not using a release to capture from one to several bursts
Evaluate your exposure – Shorter exposures (or smaller aperatures ) will darken the image and capture shorter trails, Longer exposures (or larger aperatures ) will lighten the image and capture longer trails.
Evaluate sharpness by zooming in on your image – adjust as needed

If you are using a point a shoot, check your camera’s manual for fireworks mode.

Improving Fireworks photos
Shoot with a tripod – it will give a more natural cascade of light

Why use a tripod?

Handheld image above shows motion from camera shake  in the burst of light.

The image below is steadied by a tripod, 5 seconds, f16 at 100 ISO


Other Techniques
Set your camera to B and lock open your shutter – keep the lens covered with a dark hat and remove the hat to capture a burst then recover and repeat to capture several bursts. Just be carefull not to bump your camera.
You can even zoom the lens during exposure for some interesting effects

Experiment and best of all have fun

Gallery images below shot mainly at 5 seconds, f16 at 100 ISO

Don’t be a hard drive crash test dummy


Our customer’s hard drive crashed. It stored nearly 10 digital years worth of her family images: births, family vacations, birthdays, parties, graduations, and other events. Our customer’s digital images had not been printed out (unlike analog photos) – they had been shared on the computer and occasionally uploaded to a digital frame or to an online photo site. Her backup consisted of an external hard drive (also damaged) and an incomplete collection of floppy disks, CDs and DVDs, plus about 1% of their images saved at an online photo site.

This was just too close for comfort, since my own personal backup situation was similar. During the past 15 years I’ve relied on a hodge podge of backup methods: floppy disks, tape drives, CDs, DVDs, online photo services and other online backup solutions.

I set out to find a reliable, affordable online backup solution for my data. Online photo websites that are free often have fine print in the user agreement that allows website to reduce the resolution of stored images if you don’t make a certain number of paid prints, etc. Although it is extremely easy to upload hundreds of images to these websites, if you ever want your images back you must download them one by one which becomes an impossible task if you have thousands of images, as many of us do. (The BCC digital lab was recently hired for $125 an hour by a customer who lost several hundred images, to download images individually from his online printing website – not an inexpensive proposition).

AT LAST: A SMART, AFFORDABLE SOLUTION

After spending some time researching I chose Mozy.com online backup. I signed up for a yearly account. Just moments after installing the Mozy applet, data started backing up over my cable connection at about 10 gigabytes a day. Well, it’s finally complete – for the first time ever I have a complete off-site backup of all my images . . . nearly 50,000, genealogy files, and documents taking up just over 500 Gb (that’s more than half a terabyte, 500,000 megabytes, or the equivalent of about 800 CDs).

Mozy.com is a fully encrypted online backup service that costs around $55 a year. Less if you get a 2-year membership paid up front. Once signed up you have unlimited storage for the flat annual fee. With Mozy you can back up one computer and any drives that are connected to your computer. Many other online backup solutions will only backup drives inside your computer, not external drives. Once installed the process is very automatic. If you power down or reboot your computer, the backup resumes automatically. Backups over broadband upload 5-10 gigabytes per day. Easy configuration options even allow the backup to proceed only when the computer is idle. My computer is relatively new so I left it set for maximum backup speed for the entire time. Mozy will also automatically add and delete as you move files into or out of your watched folders you designate.

At last, I have my images protected.

Also just added to Mozy 2.0 is the ability to create a local backup to an external drive which gives you the best backup a scenario – a local and remote copy!

To learn more or sign up for your own Mozy account, just click on the Mozy logo below.

Lunar Photography – getting the correct exposure

Man in the Moon
"Man in the Moon" taken during a partial lunar eclipse

Next Full Moon – March 29, 2010 

I recently had a customer ask me the best way to photograph the moon. It seems that they never could see any detail in the moon (overexposed) and the overall image was dark.  First, the moon is much brighter and takes up a small portion of the image – the camera meter gets fooled since it sees all the darkness and sets an exposure that washes out the moon. Second the variation between light and dark values is beyond what your camera is capable of capturing in a single shot. We’ll talk about a fix to this problem later on . . . a little trick that involves using an imaging program like Photoshop Elements.   

To capture the full “Man in the Moon” effect is easy to do by setting your camera manually to expose for the moon.  We set the camera manually because your camera’s metering system usually gets fooled.   Setting your camera manually eliminates this exposure error – the moon is always lit with the same intensity with the exception of solar eclipses.  

For the complete “Man in the Moon” look, we suggest the following exposure – ISO 100 -1/125th second @ f/11When the moon is not full it is also very easy to get your exposure. Since a half moon is half as bright you just need to open your lens up by one more stop which lets twice a much light in – ISO 100 – 1/125th second @f/8. Using the same convention a 1/4 moon would require 4x as much light as the full moon or 2 stops more light and a setting of  1/125th second @ f/5.6. A tripod is always a great option for the sharpest shots especially when using a telephoto lens.   

Black Cat Exposure Guide
A Black Cat exposure guide (pictured above) is a great tool that lists manual exposure settings for more than 100 scenes. Just choose your scene – line up the scene code to your ISO and just set your camera to one of the displayed f-stop and shutter speed combinations. The Black Cat Exposure Guide is a must for anyone into time exposure and existing light photography. We stock the Black Cat Exposure Guide in Westwood & Englewood.  

Getting both the moon and your scence exposed correctly in the same image is easily accomplished by compositing a properly exposed image of the moon with a properly exposed night scene in a program like Photoshop Elements. 

Questions – Stop by, email or give us a call.  Comments? Let us know if you liked this post. What other things you would like tutorials about?

How to Get White Snow – Winter Shooting Tips

White snow with camera at plus 1

Why is my snow grey

Predominantly white scenes ( think Snow, white sand beaches, clouds )will be moved toward grey so we must over expose from .5 – 1.5 stops to get true white by using the +/-.
Predominantly black scenes ( think black cars, black buildings, black sand beaches )will be moved toward grey so we must under expose .5 – 1.5 stops to get true black by using the +/-.
 A future tutorial will explain how to get perfect exposures using a grey card.

Using histograms to further understand

For those familiar with histograms we can further look into diagnosing our exposure. The histograms are shown below with both our camera exposure and with exposure compensation set on + 1.0. Histograms are available in almost any digital camera including point and shoots and most imaging programs like Photoshop Elements.

A histogram is just a map of the tonal values in our image from black (left most point) to white (right most point) with the height representing how much of the image is at a particular level of brightness. Your histogram will look the same in camera and when you open that image up in your imaging program.


^Black                   Middle^Grey                        White^

Grey snow historgram - normal exposure

In the grey snow example above our histogram has a good deal of room before the white point on the right so the image represented by this histogram is a shade of grey not white. By overexposing one stop ( +/- +1.0) the camera automatically adjusts and allows 1 extra stop or twice the amount of light. As you can see from the histogram below we still have a small amount of room before the white point (this room indicates we have not blown out our highlights. If this histogram started all the way to the right and did not build to a peak, this would indicate over exposure and blown out highlights. The fix would be to reduce the exposure compensation from +1.0 to +0.7 and check again. The peak will move to the left each time you reduce your exposure. More on histograms in an upcoming tutorial.

White snow when overexposed histogram

Please let us know what you think of this tutorial and let us know what else is causing a challenge in your photography.


Sensor Dust – Full Service or DIY

Ever take a picture and have it look like this? We hope not. This is an extreme case of sensor dust — probably as bad as you’ll ever see. Dust is a part of everyday life and getting it on a digital SLR’s imaging sensor is a problem every photographer has to deal with.

We offer a full service sensor cleaning available for $49.99 (DX sized sensors and smaller) or $79.99 (full frame sensors). We’ll take a picture before and after the cleaning, so you can see the results first hand.  We also can show you how to do it on your own, and sell you all of the supplies you’ll need. Either way, sensor cleaning is a regular and expected part of normal maintance on most all digital SLRs.

A DSLR’s sensor carries an electronic charge and it loves dust, just like a tube television. Changing lenses, zooming, even something as minute as focusing can bring dust into the camera. We find the best way to determine exactly how much dust is on your sensor is to take a photo of the sky at f16 or higher. Make sure your camera is set to manual focus – otherwise the lens will keep seeking a focus point. Next, load up your image in Photoshop and enlarge it to 100%. That’ll give you the ability to see every tiny bit of dust that’s plaguing your sensor. Don’t worry if there’s a Boeing 767 on your sensor – it’s most likely just in the sky.

So now that you see the dust, what do you do with it? There’s always the option of cloning out all the dust in Photoshop, but that’s an hour’s worth of time better spent behind the camera. If you have the courage, you can clean the sensor yourself with the right equipment and supplies.

If you decide to try it yourself, check to see if your camera has a “clean sensor” option in the set-up menu. Many DSLRs require you to have a fully charged battery in order to clean the sensor. If the “clean sensor” option is greyed out, a low battery is most likely the reason. Charge your battery fully and give it another go. If you have an older dSLR, it’s possible that it does not have a “clean sensor” option. At that point, in order to access the sensor yourself, your only option is to put the shutter on bulb and clean it that way — but it’s a very risky method. If you accidentally release that shutter while cleaning, it’s going to be a costly repair. Also, the sensor will be activated, increasing the chances of even more dust appearing.

Okay, so now you have access to the sensor. What now? Whatever you do, DO NOT use compressed air to clean your sensor. Many types of compressed air emit tiny particles of liquid propellant which can damage your sensor. Always use products meant specifically for sensor cleaning, such as Sensor Swabs and E2 solution available from BCC. Bulb blowers are a great way to do a quick cleaning; never do a wet cleaning unless it is absolutely necessary. You can even buy small, travel-friendly bulb blowers for cleaning on the go.

There’s nothing wrong with wanting to try it yourself, but beware – some camera manufacturers’ warranties become void if you clean the sensor yourself.

If you’re having dust problems please feel free to stop by one of our stores. If you’d like to purchase the cleaning products and try it yourself we’ll be happy to walk you through the process. If you’re more of the butterfingers type and don’t want to risk it, bring your camera into the store and we can clean it for you.

Summer Photo Tips

Each year many customers ask me for tips and ideas as to how to improve their photos during their summer vacation.

Step 1: Polarize It! – A circular polarizing filter will do magical things to your photos – especially at the beach or during the fall foliage season. First and foremost, it will minimize glare on reflective surfaces, such as water (which is commonly found at the beach, in case you didn’t know). That’s something that no amount of photoshop can mimic. In addition to that, it’ll help add contrast and color saturation to your images, giving them that additional “pop” that so many photographers covet. There is one downside to using a polarizing filter and that’s the fact that it’s going to cut your light down by approximately 2 stops. Make sure you have enough light for the exposure or use a tripod.

Just like any other filter there are many different categories of circular polarizers. They can range in price from $50 all the way up to $300, depending on size and brand. The better the filter, the better the photo. It’s as simple as that.
Recommended brands: Promaster HGX, Promaster Digital, or B+W if you’re feeling rather German.

Step 2: Use A Flash! – If you’re photographing people outdoors you almost always want to use a flash. Using a flash will help minimize those high contrast areas and fill in those unflattering dark shadows that appear under the eyes, nose, and chin. It will also help if your subject is in a backlit situation, which nearly always happens at the beach. Unless it’s raining – but then why are you even at the beach?!

Step 3: Overexpose! – It’s not often that somebody recommends you overexpose your photos. At the beach or in snow your camera will usually underexpose in any of the auto-modes. The light being reflected off the sand/snow is so bright that it fools the camera into thinking that that’s the light source – which will then underexpose your image. Find the exposure compensation feature on your camera and overexpose your image by .3 to 1 stop. A significant amount of point and shoot cameras even have a beach/snow scene mode, which will do this automatically for you.

Step 4: Check Your Watch! (or Cell Phone!) – The time of day can considerably impact the quality of your images. The optimal time is an hour before sunset – also known as “The Happy Hour for Photographers The Doesn’t Involve Booze”. At this time of the day the sunlight tends to be more diffuse, giving you softer and most pleasing lighting. At this point you still would want to use flash.

Step 5: Be Careful! – Sand is a cameras worst enemy. If the sand or salt in the air gets onto your camera’s sensor it may be curtains for your vacation photos. Keep your camera in a zip-lock or waterproof bag. As long as the bag is clean and clear you should be able to shoot through the bag without issue.

As always, please stop by the store or give us a call if you have any additional questions or concerns.

And don’t forget the sunblock.