Shooting Wildlife and Wilderness in World-Class National Parks

At least twice a year, Cecil Holmes says farewell to home base in Huntsville, Alabama, and heads out to Grand Teton National Park in Wyoming. While he’s there, he also makes the four-hour drive to Yellowstone National Park, where he complements the wildlife and landscapes he photographed in the Tetons with the geysers and geothermal pools (and yes, more wildlife) found in Yellowstone. 

While photographers can find different attractions to document in the parks depending on the season, Cecil enjoys the late spring for his national park adventures. “These images were all taken in June, when there’s still snow on the mountains, the temperature is warming up a bit, and the crowds haven’t built up yet,” he explains. “Plus, as the snow melts and it starts getting warmer, the wildflowers come out in full force.”

This time around, Cecil packed his Tamron SP 24-70mm F/2.8 VC G2 and SP 150-600mm VC G2 lenses to ensure he could capture every photographic opportunity the parks threw his way. “In the Tetons, the 24-70 is the perfect landscape lens,” he says. “And the 150-600 is indispensable as a compact wildlife lens. I’ve got everything I need to document the entire trip with just these two tools.”

Here, Cecil walks us through seven images he took on his latest trip, as well as how he used the lenses to capture them.
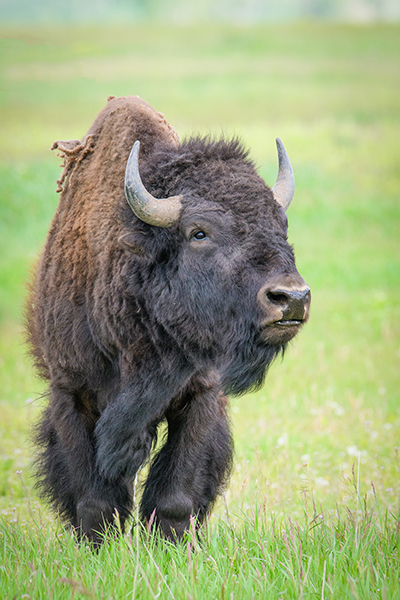
© Cecil Holmes

150-600 at 500mm, F/8, 1/500th sec., ISO 1400
Park regulations in Yellowstone mandate that visitors stay at least 25 yards away from most of the wildlife (it’s four times that for bears and wolves). But what’s fantastic about the 150-600 lens is that when you’re photographing an animal the size of an SUV, you don’t need to get terribly close to get a full-frame image of it.

In this case, we happened to see a group of bison on the side of the road and jumped out. I had my camera on auto ISO (and I usually shoot everything in Aperture Priority), so I set the aperture for F/8. The camera selects the shutter speed based on the auto ISO, so I set the auto ISO to a maximum range and then indicated to the camera I wanted a minimum shutter speed of 1/500th sec. It adjusted the ISO based on the light from that point. That’s really the best way if you’re doing a “run and gun” approach as you’re cruising along, because if you have too slow a shutter speed and the bison moves, it will ruin the shot with motion blur. 
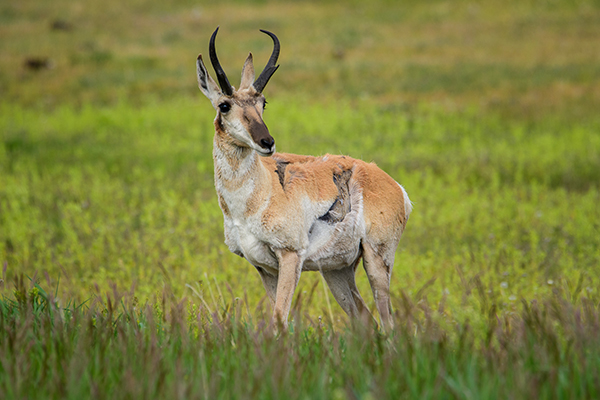
© Cecil Holmes

150-600mm at 550mm, F/8, 1/500th sec., ISO 500
In the late spring, the pronghorn, or American antelope, starts to shed its winter coat. That’s another reason I love taking pictures in the Tetons at this time of year, because you can track down a lot of these creatures hanging out with that ragged coat look. Some of them may have already shed most of their coats; others still have their coats hanging off the side of them. It makes for awesome images either way.

I tried to place some of the grass and reeds in front of the pronghorn in the frame as an appealing visual element. When people think of wildlife photography, they often think strictly of the animal in front of the camera. But for a more compelling photo, it’s important to incorporate as much of the animal’s environment as possible. I was able to blur out the foreground a bit, as well as the background, which gives the photo a bit of three-dimensionality and makes my subject pop.
© Cecil Holmes

150-600mm at 600mm, F/8, 1/250th sec., ISO 800
At the Teton Raptor Center near Jackson Hole, Wyoming, birds are brought in to be rehabilitated. People call from all over Wyoming, Idaho, and Montana to report injured birds, and the goal of the center is to eventually release them back into the wild, if they get better. 

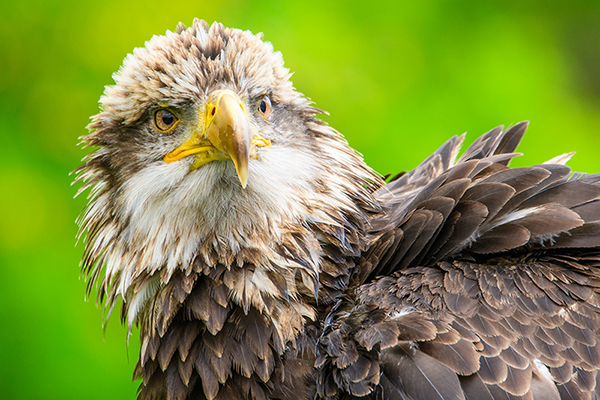
We attended a birds of prey show here, and it was a controlled environment where we could get fairly close to the raptors. They bring each bird out every two or three shows so it doesn’t get too stressed. I’d never been to a show like this, so I brought along my 150-600. I decided to put it to best use by stepping back a bit and capturing some tight headshots. 

This photo was of a bald eagle named River, in what one could call its teenage years, before it had lost its brown feathers and morphed into the white eagle we’re used to seeing. It had just dipped into a bathing pool and was trying to dry off, which is why its feathers look so ruffled. The crisp sharpness of the 150-600 allowed me to capture every detail in every feather, and I blurred out the background to get that eye-catching color contrast of brown and green.
© Cecil Holmes

24-70mm at 24mm, F/8, 25 sec., ISO 100
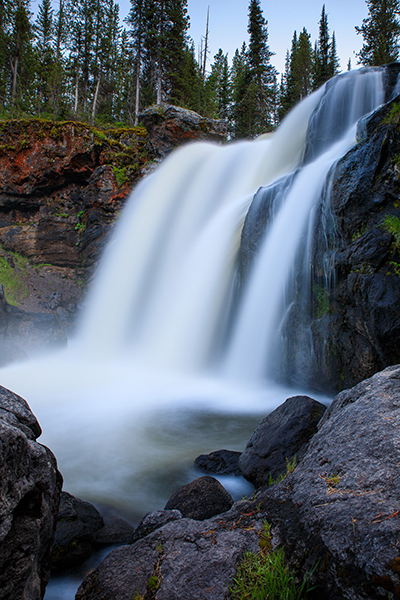
This photo of Moose Falls along Crawfish Creek wasn’t a planned shot at all. We were just driving down the road right before sunset when I saw the sign for it; we didn’t have a lot of time to capture the remaining light. I said, “OK, if we get out of the car and hear water, we’ll grab our gear and run down; if we can’t hear the water, that means it’s too far and we won’t make it.” We got out and heard the water, and it turned out the falls were only about a tenth of a mile from where we parked. It was flowing really nicely, as the park had had a huge amount of snowfall this winter—meaning lots of corresponding snow melt creating lots of full rivers and streams. 

Typically when you’re shooting waterfalls, light is your enemy—you don’t want very much of it, because you want a longer shutter speed to get that smooth, creamy effect in the water. The light was really starting to fade at this point, so I used a 25-second exposure at F/8. If I’m photographing a waterfall in the daytime, I’ll shoot at F/16 to get a lower shutter speed, but in this case I didn’t need that low shutter speed— I needed to get my aperture open enough to get a shutter speed that wasn’t going to be minutes long. The 24-70 really came through for me in this low-light situation.
© Cecil Holmes

24-70mm at 24mm, F/16, 1/80th sec., ISO 100
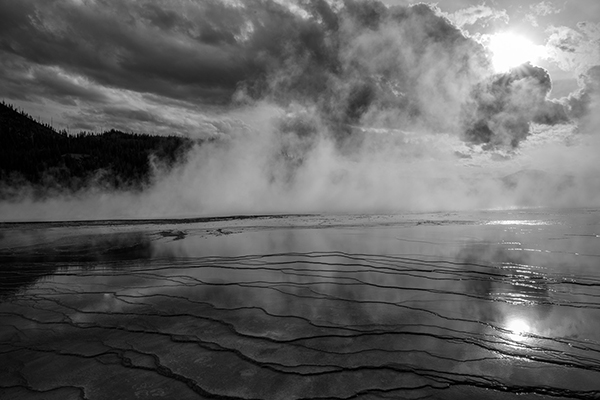
The Grand Prismatic hot spring is one of the most photographed geothermal attractions in Yellowstone. Many photos of it that you see from above are taken from either a helicopter or plane, or by people who hike the trail that overlooks it. But when you’re right down there with it, it’s challenging to shoot—it’s not nearly as impressive as when you’re seeing it from up high. Plus, if you’re photographing it on a nonwindy day, the steam emanating from it will just rise and hang in the air. You want a little wind to blow the steam around a bit.

Luckily, I had just enough breeze so that the steam was moving. I was standing right on the boardwalk next to it, and I got down and put my camera as low and close to the pool as I could get it without actually touching anything—you don’t want to scald your equipment! I was trying to capture a sunstar (you can see the sun poking out from behind the cloud in the upper right), but I wasn’t able to get it. Because of that, and because the light wasn’t great, I decided to see what would happen if I turned it into a black-and-white photo. That changed everything. It created a mood I wasn’t seeing in color, and it brought out the textures, patterns, and contrasts of the pool and surrounding area.
© Cecil Holmes

24-70mm at 24mm, F/8, 1/200th sec., ISO 100
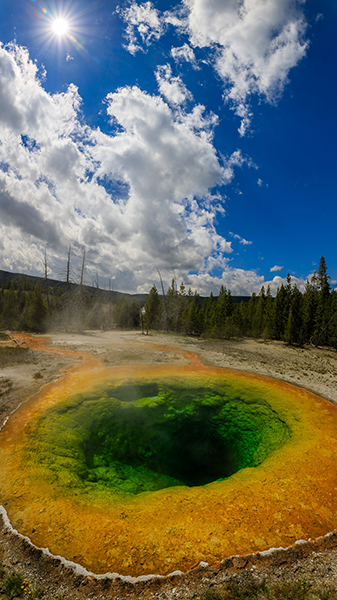
The Morning Glory hot spring is one of my favorite pools to visit in Yellowstone. It’s not very big, maybe about 20 feet wide, and the boardwalk there puts you right along the edge of it. I took about three or four shots at 24mm vertically and then created a panoramic composite. I was finally able to capture that elusive sunstar, and the clouds in that vibrant blue sky added to the overall effect as well.

It’s essential to use a polarizer for an image like this. If you don’t, you’re going to get reflections off the water and won’t be able to see all of those colors and details beneath the surface.
© Cecil Holmes

24-70mm at 24mm, F/16, 0.3 sec., ISO 100
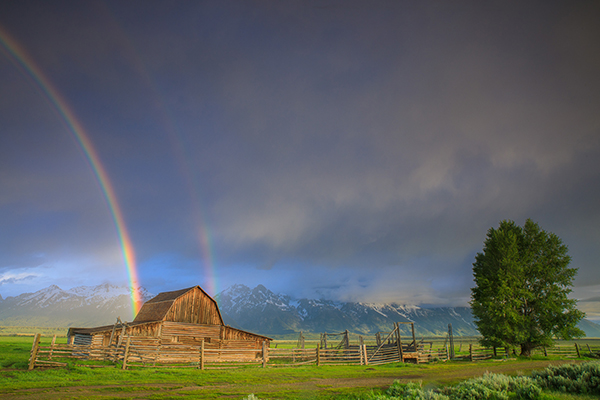
While the shot of the Morning Glory Pool was my favorite photo from Yellowstone, this photo of the John Moulton Homestead was my favorite from the Grand Tetons. The morning I took this photo was horrible. It was raining when I woke up, but I figured I was already awake, so I went out anyway to see if I could get anything. I thought maybe, at the very least, I’d get some lightning shots over the mountains.

Right at sunrise, sunlight started to peek out and hit the barn. And then, for about three minutes, this amazing double rainbow appeared that stretched from the John Moulton Homestead to the T.A. Moulton Barn about a quarter-mile down Mormon Row. After that, the sun disappeared and it was gloomy for the rest of the day. Only about 10 photographers were out that morning to witness it, as opposed to the 30 or 40 who might usually be out and about. For someone like me who doesn’t live in the area, this was a once-in-a-lifetime deal. 

To see more of Cecil Holmes’ work, go to www.cecilsphotos.com

End the Blurry Pictures and Take Some Better Pictures

Frustrated? Confused? Wondering why that picture just doesn’t look anything like you were hoping it would?

We are here to help.

Getting the best out of your camera always takes a bit of knowledge and some preparation. Photography can be overwhelming and frustrating at times, but really there are only three important elements of digital photography: Shutter Speed, Aperture, and ISO. Once you gain a basic understanding of these three elements, you will find your pictures are vastly better. These three elements are connected in the camera, and changing one of the elements will effect the other two.

If at any point in reading this you get overwhelmed or confused, you can always stop in or call Bergen County Camera to ask questions.

Camera Modes

A21C8975 copy
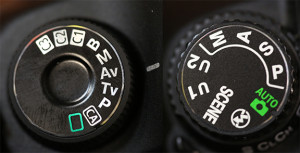
Mode Dials of a Canon 5D Mark II (Left) and a Nikon D7000 (Right)

Most cameras have five modes: Auto, Program, Shutter Priority, and Aperture Priority, and Manual. Some cameras only have two modes: Auto and Program. Many cameras have additional modes, but these are auto modes which often do not help you take better photos. In each of these modes you are controlling one or more elements of photography.

Auto – the camera controls everything. While this is the easiest mode to use, it is also the most likely to give you blurry images.

Program – Allows adjustment of the ISO.

Shutter Priority – Allows adjustment of the ISO and shutter speed.

Aperture Priority – Allows adjustment of the ISO and aperture.

Manual – Allows adjustment of the ISO, shutter speed, and aperture. This is the most difficult mode to use because you must use the meter in the camera to find the correct exposure for your picture.

A21C8962
Rear screen of a Canon G11. Often this information can be found by activating the autofocus on your camera. (pressing the shutter button down half way)

Shutter Speed

Every time you press your shutter button and take a picture, a window opens inside your camera, exposing the area which creates the image, the sensor, to light. The less time the sensor is exposed, the less motion you see in an image. Shutter speed is shown as a fraction of a second. In the image below, the shutter speed in the red box is 1/20th of a second. This is telling you that the window inside the camera will open and then close 1/20th of a second later.

The average person, holding a camera still needs a shutter speed quicker then 1/60th of a second to get a clear, non-blurry image. If the shutter speed is slower then 1/60th of a second, you need to change either the Aperture or ISO.

Aperture

A21C8976
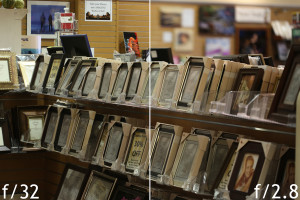
Depth of Focus variation from adjusting the camera’s Aperture

Aperture describes the amount of light passing through the lens into the camera. All lenses are marked with a maximum aperture, weather it’s on a point and shoot or an SLR. The aperture is also known as the f-stop. In the image below, within the blue box shows an aperture of “F2.8”. The lower the f-stop, the more light that is entering the camera. The more light entering the camera, the quicker the shutter speed can be to give you correct exposure.

The aperture also controls your depth of focus in an image. If you are looking to have your subject in focus, but the background blurry, you need a low aperture lens and a low aperture set on the camera. When a photographer talks about stepping a lens down, he is describing shooting at a higher f-stop. The higher the f-stop, the less light entering the lens, and the greater your depth of focus becomes. This is what you would do if you were shooting a landscape image where everything from the grass to the mountains to the clouds was in focus.

ISO

ISO is the sensitivity of the sensor of the camera. The higher the ISO, the more sensitive the camera is to light, and the quicker the shutter speed can be to give you a correctly exposed image. In the image below, in the yellow box, the ISO is set to 800. For those wondering, ISO stands for International Organization for Standardization. When you shoot at higher ISO settings, you are likely to see more noise in your images. Noise is a speckling of randomized color in your image. The lower your ISO, the less noise you get. However, the lower your ISO, the slower your shutter speed needs to be to get a correctly exposed image.

Bring It All Together

So your image is blurry. This occurs when your shutter speed isn’t quick enough. In order to raise your shutter speed, you need to either raise your ISO or set your aperture to a lower f-stop. Making your sensor more sensitive or allowing more light into the camera will allow you to shoot at a high enough shutter speed to take a clear image.

Keep in mind that 1/60th of a second is the magic number in most situations, however if you are shooting sports, dancing, or any other high motion activity, you may need a shutter speed upwards of 1/1000th of a second.

Still Unable to Get a Clear Image?

In some situations, your camera will be unable to obtain a shutter speed quick enough to get a correctly exposed image. I have run into this issue at concerts where lighting is incredibly low. I prefer a clear image which is underexposed over a blurry image which is correctly exposed, then restoring correct exposure using photo editing software. Shooting Manual, I will set my shutter speed to 1/60th of a second through 1/250th of a second. Next I’m setting the aperture to as low an f-stop as possible, thus letting in as much light as possible. And finally I’m setting my ISO as high as I can, without having too much noise. Find this setting before the concert by taking photos in a low lit area and raising your ISO between shots. RAW image format is extremely useful in this situation. RAW is an uncompressed image format which retains more information about the image for editing. In a RAW processor such as Adobe Lightroom, you can raise an image’s exposure back to correct level. This is a difficult process, but if you’re stuck in a bad lighting situation, you need to be able to adapt.

Still have questions? Still feeling lost?

We are here to help you enjoy photography. Stop by Bergen County Camera in Westwood. We offer classes, private tutorials, and trips to help you enjoy your camera.