Shooting Wildlife and Wilderness in World-Class National Parks

At least twice a year, Cecil Holmes says farewell to home base in Huntsville, Alabama, and heads out to Grand Teton National Park in Wyoming. While he’s there, he also makes the four-hour drive to Yellowstone National Park, where he complements the wildlife and landscapes he photographed in the Tetons with the geysers and geothermal pools (and yes, more wildlife) found in Yellowstone. 

While photographers can find different attractions to document in the parks depending on the season, Cecil enjoys the late spring for his national park adventures. “These images were all taken in June, when there’s still snow on the mountains, the temperature is warming up a bit, and the crowds haven’t built up yet,” he explains. “Plus, as the snow melts and it starts getting warmer, the wildflowers come out in full force.”

This time around, Cecil packed his Tamron SP 24-70mm F/2.8 VC G2 and SP 150-600mm VC G2 lenses to ensure he could capture every photographic opportunity the parks threw his way. “In the Tetons, the 24-70 is the perfect landscape lens,” he says. “And the 150-600 is indispensable as a compact wildlife lens. I’ve got everything I need to document the entire trip with just these two tools.”

Here, Cecil walks us through seven images he took on his latest trip, as well as how he used the lenses to capture them.

© Cecil Holmes

150-600 at 500mm, F/8, 1/500th sec., ISO 1400
Park regulations in Yellowstone mandate that visitors stay at least 25 yards away from most of the wildlife (it’s four times that for bears and wolves). But what’s fantastic about the 150-600 lens is that when you’re photographing an animal the size of an SUV, you don’t need to get terribly close to get a full-frame image of it.

In this case, we happened to see a group of bison on the side of the road and jumped out. I had my camera on auto ISO (and I usually shoot everything in Aperture Priority), so I set the aperture for F/8. The camera selects the shutter speed based on the auto ISO, so I set the auto ISO to a maximum range and then indicated to the camera I wanted a minimum shutter speed of 1/500th sec. It adjusted the ISO based on the light from that point. That’s really the best way if you’re doing a “run and gun” approach as you’re cruising along, because if you have too slow a shutter speed and the bison moves, it will ruin the shot with motion blur. 

© Cecil Holmes

150-600mm at 550mm, F/8, 1/500th sec., ISO 500
In the late spring, the pronghorn, or American antelope, starts to shed its winter coat. That’s another reason I love taking pictures in the Tetons at this time of year, because you can track down a lot of these creatures hanging out with that ragged coat look. Some of them may have already shed most of their coats; others still have their coats hanging off the side of them. It makes for awesome images either way.

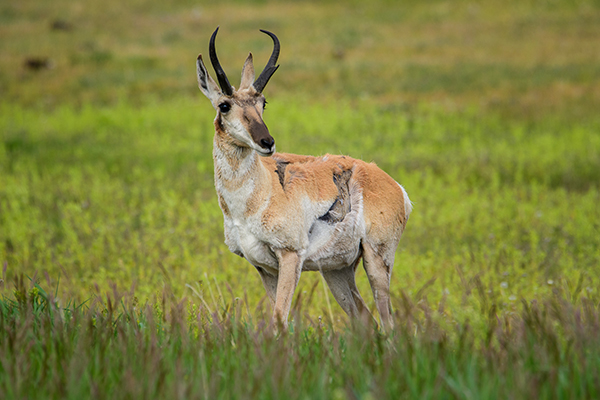
I tried to place some of the grass and reeds in front of the pronghorn in the frame as an appealing visual element. When people think of wildlife photography, they often think strictly of the animal in front of the camera. But for a more compelling photo, it’s important to incorporate as much of the animal’s environment as possible. I was able to blur out the foreground a bit, as well as the background, which gives the photo a bit of three-dimensionality and makes my subject pop.

© Cecil Holmes

150-600mm at 600mm, F/8, 1/250th sec., ISO 800
At the Teton Raptor Center near Jackson Hole, Wyoming, birds are brought in to be rehabilitated. People call from all over Wyoming, Idaho, and Montana to report injured birds, and the goal of the center is to eventually release them back into the wild, if they get better. 

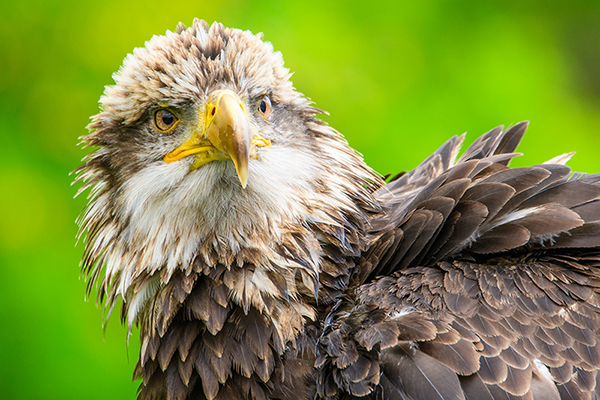
We attended a birds of prey show here, and it was a controlled environment where we could get fairly close to the raptors. They bring each bird out every two or three shows so it doesn’t get too stressed. I’d never been to a show like this, so I brought along my 150-600. I decided to put it to best use by stepping back a bit and capturing some tight headshots. 

This photo was of a bald eagle named River, in what one could call its teenage years, before it had lost its brown feathers and morphed into the white eagle we’re used to seeing. It had just dipped into a bathing pool and was trying to dry off, which is why its feathers look so ruffled. The crisp sharpness of the 150-600 allowed me to capture every detail in every feather, and I blurred out the background to get that eye-catching color contrast of brown and green.

© Cecil Holmes

24-70mm at 24mm, F/8, 25 sec., ISO 100
This photo of Moose Falls along Crawfish Creek wasn’t a planned shot at all. We were just driving down the road right before sunset when I saw the sign for it; we didn’t have a lot of time to capture the remaining light. I said, “OK, if we get out of the car and hear water, we’ll grab our gear and run down; if we can’t hear the water, that means it’s too far and we won’t make it.” We got out and heard the water, and it turned out the falls were only about a tenth of a mile from where we parked. It was flowing really nicely, as the park had had a huge amount of snowfall this winter—meaning lots of corresponding snow melt creating lots of full rivers and streams. 

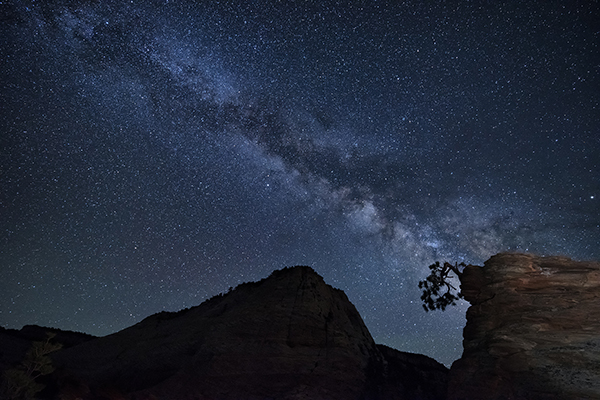
Typically when you’re shooting waterfalls, light is your enemy—you don’t want very much of it, because you want a longer shutter speed to get that smooth, creamy effect in the water. The light was really starting to fade at this point, so I used a 25-second exposure at F/8. If I’m photographing a waterfall in the daytime, I’ll shoot at F/16 to get a lower shutter speed, but in this case I didn’t need that low shutter speed— I needed to get my aperture open enough to get a shutter speed that wasn’t going to be minutes long. The 24-70 really came through for me in this low-light situation.

© Cecil Holmes

24-70mm at 24mm, F/16, 1/80th sec., ISO 100
The Grand Prismatic hot spring is one of the most photographed geothermal attractions in Yellowstone. Many photos of it that you see from above are taken from either a helicopter or plane, or by people who hike the trail that overlooks it. But when you’re right down there with it, it’s challenging to shoot—it’s not nearly as impressive as when you’re seeing it from up high. Plus, if you’re photographing it on a nonwindy day, the steam emanating from it will just rise and hang in the air. You want a little wind to blow the steam around a bit.

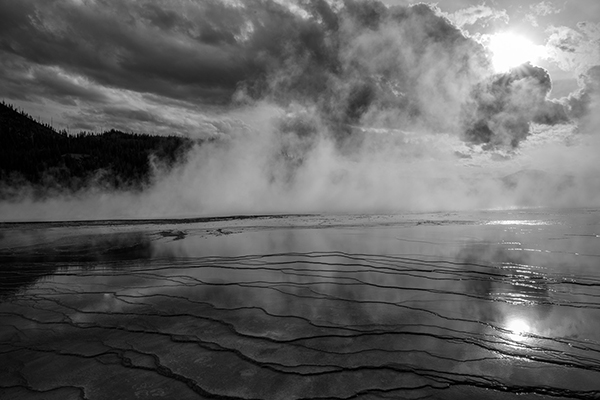
Luckily, I had just enough breeze so that the steam was moving. I was standing right on the boardwalk next to it, and I got down and put my camera as low and close to the pool as I could get it without actually touching anything—you don’t want to scald your equipment! I was trying to capture a sunstar (you can see the sun poking out from behind the cloud in the upper right), but I wasn’t able to get it. Because of that, and because the light wasn’t great, I decided to see what would happen if I turned it into a black-and-white photo. That changed everything. It created a mood I wasn’t seeing in color, and it brought out the textures, patterns, and contrasts of the pool and surrounding area.

© Cecil Holmes

24-70mm at 24mm, F/8, 1/200th sec., ISO 100
The Morning Glory hot spring is one of my favorite pools to visit in Yellowstone. It’s not very big, maybe about 20 feet wide, and the boardwalk there puts you right along the edge of it. I took about three or four shots at 24mm vertically and then created a panoramic composite. I was finally able to capture that elusive sunstar, and the clouds in that vibrant blue sky added to the overall effect as well.

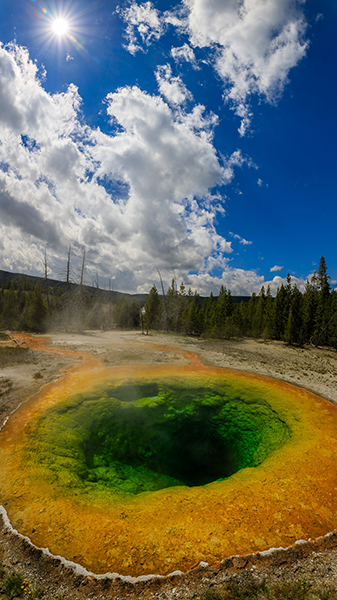
It’s essential to use a polarizer for an image like this. If you don’t, you’re going to get reflections off the water and won’t be able to see all of those colors and details beneath the surface.

© Cecil Holmes

24-70mm at 24mm, F/16, 0.3 sec., ISO 100
While the shot of the Morning Glory Pool was my favorite photo from Yellowstone, this photo of the John Moulton Homestead was my favorite from the Grand Tetons. The morning I took this photo was horrible. It was raining when I woke up, but I figured I was already awake, so I went out anyway to see if I could get anything. I thought maybe, at the very least, I’d get some lightning shots over the mountains.

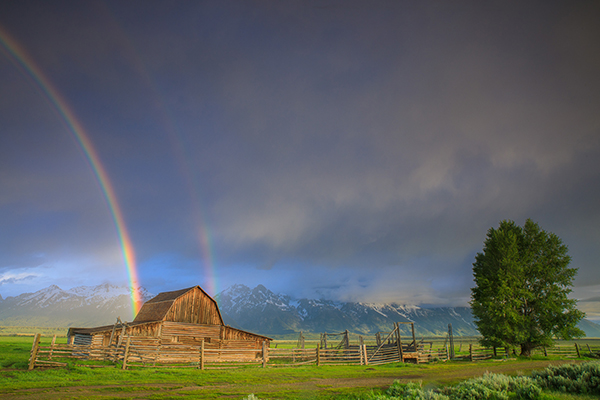
Right at sunrise, sunlight started to peek out and hit the barn. And then, for about three minutes, this amazing double rainbow appeared that stretched from the John Moulton Homestead to the T.A. Moulton Barn about a quarter-mile down Mormon Row. After that, the sun disappeared and it was gloomy for the rest of the day. Only about 10 photographers were out that morning to witness it, as opposed to the 30 or 40 who might usually be out and about. For someone like me who doesn’t live in the area, this was a once-in-a-lifetime deal. 

To see more of Cecil Holmes’ work, go to www.cecilsphotos.com

Photographing National Parks After Dark with Ken Hubbard

Ken Hubbard, an avid Tamron shooter, shares some of his tips for photographing the night sky in our National Parks.

Pack wide-angle lenses.
This is a no-brainer, since you want to get as much of that jaw-dropping night sky as possible in your photos. The lenses I typically use: the Tamron SP 24-70mm VC G2, the SP 15-30mm VC, and the SP 35mm F/1.8 VC. That prime lens is especially useful because of its fast F/1.8 aperture—it’s desirable to use fast apertures for night sky photos, as you want to reduce the amount of time your shutter is open to reduce star movement. With a 1.8 lens, I can shoot a 10-second exposure instead of 20 or 30 seconds.

There’s a magic number for any focal length you may be using and how long your shutter can stay open before you start getting those streaks in the stars. Although there are some complicated equations, let’s keep it simple. A basic guideline to get you started is the 500 rule: Divide the focal length you’re shooting at into 500; that resulting number will give you the number of seconds your shutter can stay open before you start seeing star movement. So if I’m shooting at 15mm, I can keep my shutter open for roughly 33 seconds. If you see movement in your stars, shorten your exposure.

Determine the optimal time to head out.
Our group tries to venture out during the blue hour, an hour or two after sunset, when there’s still some ambient light to create that beautiful indigo color. You can see an example of that in one of my Sedona photos shown here, where the featured rock formation was also lit up by the quarter-moon that had already risen.

© Ken Hubbard

If you’re going to try for a money shot like the Milky Way, you’ll want to check apps like Sky Guide or PhotoPills to see where and when it will be rising. You don’t want to head out somewhere with a group of people and discover there’s no Milky Way overhead. Capturing it when the skies are darkest—typically between midnight and 2 a.m., depending on the time of year— is ideal. Between April and September provide your best looks: During other parts of the year, the Milky Way either never makes it above the horizon, or it’s too close to sunrise or sunset and will be completely washed out. You’ll barely see it, if at all.

© Ken Hubbard

Research the park you’re going to.
I often start this process months ahead of time, so I’ll know the best times of year to visit, depending on what I’m planning on taking pictures of. Our group will also head out at least a day before a workshop, so we can scout the landscape to make sure it’s everything we were anticipating. You also want to get the lay of the land during the day so when it’s dark you’re not stumbling around with no sense of place.

It also helps to know which parks are rife with light pollution and which aren’t. You can check the International Dark-Sky Association website to see which communities have pledged to preserve the night sky by keeping lighting to a minimum. As far as the national park areas I’ve visited, Sedona is a designated dark-sky community; Zion isn’t too bad, either, and Acadia in Maine is pretty dark, as there aren’t too many towns around throwing off a lot of light. If you do have a park that’s lit up from afar, you can use that light to your advantage (or at least mask it) by using some creative techniques. More on that a little later!

Bring the basics …
A couple of things you’ll definitely need: a tripod, as you’re going to be taking very long exposures (20 or 30 seconds long in some cases). And you’ll want to bring a shutter release cable or some sort of shutter remote. You don’t want to be hand-firing the camera and risk losing images that way.

… and also a flashlight.
One, to see where you’re going, and second for light painting. That’s a terrific way to accentuate your images, like I did in my photo of Mormon Row in Grand Teton National Park. One tip I have for this type of creative endeavor: Don’t simply throw the light from behind your camera—your subject will tend to look flat. Because I’m usually taking 20- or 30-second-long exposures in these cases, what I’ll do is hit the shutter release, then walk to one side or the other of my camera and throw the light in from an angle, so it adds a little more dimension with shadows and highlights.

© Ken Hubbard

Sometimes other photographers’ light-painting adventures can work their way into your own photos. This image I took of one of the arches in Arches National Park was a happy accident. I was about 20 seconds into a 25-second exposure when someone who was sitting underneath the arch decided to blast it with light. I didn’t know it was going to happen, but it turned out to be a cool picture anyway.

© Ken Hubbard 

Before you start flashing lights everywhere, know the rules of the park you’re visiting.
Workshop leaders need permits no matter what to host groups in most national parks. The group that ran this year’s night sky workshops for us was National Park Trips Media, which took care of all of the logistics.

Some parks outright prohibit the light painting I mentioned earlier, especially from large groups. I can understand that: It can be annoying to individual photographers or nature-gazers in a park, trying to check out the night sky, only to have a bunch of people show up all at once and start blasting light everywhere. Individually, you often can light paint without a hassle, though check with your destination park before you go, as each has its own rules.

Seek out elements in your landscape to enhance your composition. 
Here’s where landscape photography during the day and at night doesn’t differ too much, because you always want some kind of landscape elements to create compelling visuals. That could entail some sort of silhouetted area or foreground visual—either a manmade one, like a building, or a natural one, like a rock formation. 

More often than not, I’ll try to keep those foreground elements in the lower third of the frame, as I’m using them mainly to enhance the night sky I’m trying to show off. And since I’m typically using a wide-angle lens in my night photography, I get up real close to whatever I’ve decided my subjects will be, as those elements will appear very small in a wide-angle photo otherwise. 

Tap into the leading lines of the landscape. 
I use natural lines to draw the viewer’s eye to where I want it to go. For instance, in my Milky Way photo taken in Zion, I positioned myself so the Milky Way descends straight down into the rock formation with the tree sticking out of it. 

© Ken Hubbard

I’ll also use the shape and structure of the landscape to either enhance the photo or mask issues that might be threatening to distract from what I’m trying to show. For instance, in my other photo here from Zion, I used the lights of the town of Springdale in the distance to silhouette the trees in that gap. And in my image of Balanced Rock taken in Arches National Park, the horizon was really lit up from Moab. To work around that, I stood in a spot so that when I took the photo, the Milky Way streamed down toward the horizon—making it appear as if the Milky Way was lighting up the horizon, not the neighboring city.

You can find more of Ken’s work here.

National Park Lifetime Passes

Do you love to take pictures at National Parks? 

Did you know that if you’re aged 62 or older you’re eligible to receive a senior pass at only $10? Once known as the Golden Age Passport, it is a lifetime pass valid for entrance to over 2,000 federal recreation sites including national parks, monuments, historic sites, recreation areas, and national wildlife refuges which normally charge entrance fees. Pass holders that are driving into areas with entrance fees can also bring in traveling guests with them for free. At some areas, the pass even includes 50 percent discounts on camping, boat launching, etc. On August 28th, this pass’s cost is increasing 700 percent to $80.00. The price has been at $10.00 since 1994. The new $80.00 price tag will now be of equal price to that of a years pass for one person aged below 62. These passes can be purchased at locations in person as well as online at https://store.usgs.gov/senior-pass.